Affiliate Disclosure

Tuesday, July 25, 2017

Beginners Unite! Sandwiching your quilt top

Your top is pieced and you are ready to quilt it.


As with all things quilty there are different preferences for sandwiching your quilt top. I'm going to show how I sandwich my tops. I cut my backing and batting a few inches larger than the pieced top. I don't do the full four inches all around that long armers require, but that's because I quilt on my domestic machine.


I pin all my tops, lap size to wall hanging. I use masking tape, curved safety pins and the awesome Kwik Klip (no affiliation). I don't use spray baste. I know some swear by it. I don't because 1) I've never had success with it, my fabric always slides and shifts and I end up in tears and 2) I live in Minnesota, the only time I can use spray baste with proper ventilation is about 2 months out of 12. Really. It's either forty below or 80% humidity. (I say that with love, there is no better place for living the four seasons than Minnesota!)


When I quilt wall hangings, I piece my batting. I know it's not going to get washed so I just zig zag the pieces together. 


Make sure you have nice straight edges, keep the seam in the middle and stitch. I use a 2.5 stitch length and 3.5 zig zag.


Lay out your backing, making sure it's nice and smooth. I'm showing a wall hanging, but I promise, I do this for the lap size as well, on my floor, which is going to end soon, because it's getting harder and harder to get up off the floor. Place piece of masking tape in the middle of one side, then making sure your backing is smooth and a little taut (no stretching) place another piece, exactly opposite,
on the other side.


Next, place a piece on either side of the middle tape, and across on the other side.


Then again, on the other side of the middle piece of tape, and again, across on the other side.


Repeat on the top and bottom.


Then smooth your batting over the backing and tape as you did the backing.


Lay your top over the layer and begin pinning from the center out. Pin every four inches or so. I just pin whatever looks right. Which, really means, I over pin. I'm a big believer in pinning. They are my favorite quilting tool for accuracy.

Don't miss any of the Beginners Unite! posts and make sure you come back for the August 2nd post for an exciting quilt along announcement! I'm moving the next Beginners post one day, because the August Muggamo pattern comes out on Tuesday.

Happy Stitching!
Jen


1) Intro - May 2 
7) HST - Half Square Triangles (My one true love) - June 13
8) Flying Geese - June 20
13) Sandwich that top - You are here
14) Quilting - August 2
15) Binding - August 8
16) Labels - August 15

Friday, July 21, 2017

Picked By Jen ~ Fabric Basket from Pink Penguin

It has been a long time since I've done a Picked By Jen post. 
Picked By Jen is simply a pattern/tutorial that I have found, and made, and choose to share with you. The Fabric Basket from Pink Penguin is my choice for today.  


I am part of a Quilting Bee this year with eleven other quilters. Each month we make a block of the Queen Bee's choice, she will end up with eleven blocks, 12"finished and it will make a great quilt. 

I send little zipper pouches or fabric baskets with each block. It's fun to step away from quilt tops to make something quick and easy. 


The pouches are made in the same fabrics as the block. It makes for a quick sew, because the fabric has already been pulled, and since those colors were picked by the Queen Bee I know they will like them. 


This fabric basket is super easy and super fast. Both pluses when needing or wanting a quick finish. 

Happy Stitching!
Jen

Tuesday, July 18, 2017

Beginners Unite! Adding borders

Surprise! I added a topic, because I realized when I was writing the post on how to sandwich your quilts I hadn't talked about the borders.


Have you ever put borders on your finished top and ended up with waves? It can be so frustrating to have a beautiful top end up with bunched up borders, or sides that are waving at you. This can be easily avoided, and easily fixed if it happens. 

Designers give you measurements for your borders, but it is important to measure your top first, before cutting to those measurements. 

Here is how I put on borders. This is on a smaller scale, but it is the same for larger quilts, too. 
If you are putting on the side borders, first measure vertically. You need three numbers:


Left


Middle


Right


Write those measurements down. Add them, and then divide the total by three (finding the average means you divide by the number of measurements you've taken).


In this case the number is 8.458333333333, so I am going to cut my piece at 8.5" because it's close enough it won't make a difference.


I'm going to pin my border on. First I put a pin in each corner, then I pull the whole thing taut (do NOT stretch) and pin in the middle. Once I have those pins in I will pull the fabric between one corner and the middle pin taut and pin that middle. Repeat for the other side. In a larger quilt, you will use more pins. Pinning keeps the fabric from stretching and becoming wavy.


To add the top and bottom borders you will do the exact same thing, but take these measurements:


Top


Middle


Bottom. 

Add those three numbers, divide by three and use that number to cut the length of your border. Pin, stitch and press. Remember to lift and press, not push and press, that will cause wavy borders, too, by stretching the fabric.


You now have beautiful borders to frame your beautiful top. This block is a test block from Softly Circled. I made one and quickly decided the block needed to be bigger or it was going to send me to the loony bin way earlier than I have planned.

As in all things quilty, there are many ways to measure and add borders. You will get different advice from many different people. This is what works for me, I encourage you to use different techniques to find what works for you!

Happy Stitching!
Jen


Follow me on Instagram and Facebook.

1) Intro - May 2 
7) HST - Half Square Triangles (My one true love) - June 13
8) Flying Geese - June 20
11) Is there a trick to keeping those points? - July 13
12) Adding borders - You are here
13) Sandwich that top - July 25
14) Quilting - August 1
15) Binding - August 8
16) Labels  - August 15

Thursday, July 13, 2017

Beginners Unite! Keeping your points

There is nothing more frustrating than working hard on a unit and then sewing off the points. 


We've all done it. I still do it. So how do we avoid it?  There is a simple trick I will share, but we have to address accuracy first. I wrote about accurate cutting and accurate stitching. These are two very important pieces to getting nice pointy points. 


When you take the time to cut accurately and stitch accurately, you will have points that are 1/4" away from the edge, giving you plenty of space for the seam allowance. 

Sometimes though, our stitching is off just a bit. Maybe we ironed instead of pressed, or there was some extra fabric and our stitching wobbled a bit. For whatever reason, we are in danger of losing that precious point.

The trick to saving it is simple. Stitch with the unit on top that needs the point.


When you come to the point, watch where your needle is coming down and make sure to stitch closer to the edge of the fabric. Having your seam allowance just a little off in that one spot won't hurt your blocks. I show how I sew my slightly off blocks HERE. Remember, I never trim. Shhhhh! I know, but I don't, and my quilt tops turn out very well. :)

If you can't stitch with the unit on the top, maybe you are sewing rows and there are points on either side, you should take a close look at your rows. Note where there might be an issue with a point and put a pin in it. When you reach that point you can adjust your stitching line just a hair and continue on.


If you stitched off a point, it is worth ripping those stitches out and resewing. Press carefully and enjoy your pointy points.


Sometimes you can do all of the above and you still get points that just aren't pointy. Case in point (hahaha) my newly released Gradient Stars. That blue would not listen and refused to be pointy. Every. Single. Unit. I had to let go of control and let that stubborn unit be. If it's not enjoyable, let go and move on. 

Happy Stitching!
Jen


1) Intro - May 2 
7) HST - Half Square Triangles (My one true love) - June 13
8) Flying Geese - June 20
11) Is there a trick to keeping those points? - You are here
12) Adding Borders - July 18
13) Sandwich that top - July 25
14) Quilting - August 1
15) Binding - August 8
16) Labels  - August 15

Wednesday, July 12, 2017

Gradient Stars ~ Guest Blogger

Today Victoria from FabricAtWork.com is going to share how she tested Gradient Stars and made it hers.  Enjoy!


Hello. I am Victoria from fabricatwork.com and I’ve been invited to share my experience pattern testing (and mixing it up) for one of Jen’s new designs – Gradient Stars.

I stumbled upon Jen’s pattern testing group when doing some fieldwork for my own pattern development and testing process. I really did not need another project (a.k.a. potential long-term UFO), but Gradient Stars really caught my eye and I could see lots of different options (opportunities for day dreaming is my personal Kryptonite). I chose the smallest size - I tend toward project attention deficit and frequently only get a few blocks into a project before I get distracted by the next “shiny object” – so  it was great that the pattern really is only a few large blocks.


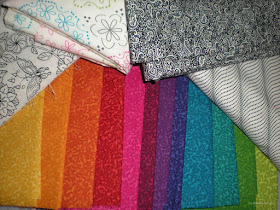
I spent a few afternoons “shopping” in my stash (a.k.a. personal warehouse). I was thinking about a Christmas quilt, but with the cold dark winter days in Wyoming I was ready for something really bright. I pulled twelve rainbow colours and needed eight so I decided on the Yellow-Red and Purple-Aqua groups. I also needed a fairly low-volume background and decided to go with the “colouring page” fabric (top left corner). I give all my fabric an overnight starch soak – and since there were a lot of bias edges to work with, I felt it really helped.


I also chose to order the Deb Tucker Rulers – I am not great with templates and tend to whack the edges off them each and every cut. I do have several quilting friends and we pool our resources so I was able to use an AccuCutter for the 3” squares and 2.5” strips, and play with some BlocLoc rulers - so I used both to compare. The BlocLoc Triangle in a Square is the same as a V Block and the Kite in a Square is the same as the Corner Beam – however the BlocLoc rulers only work for one size where Deb’s Rulers cut multiple sizes. I preferred using squares and Deb's ruler for the center kite (but it does have more waste). Conversely I preferred using the templates for the side pieces - Deb's ruler was a little clunky for the second side unit. For trimming pressing the seams open (no pressing guidance given with Deb's ruler) seemed to work better with Deb's ruler. BlocLoc requires pressing toward the sides, and the trimming was pretty easy. In the end, the two methods produced identical units.


There were a *lot* of V Block and Corner Beam units, and to break them up I started sewing them as “leaders and enders” during other projects. A word of caution on the V blocks – the triangle is *almost* - but not quite – an equilateral triangle, so when tired you can start sewing sides to the base. When tired you can also start seeing things – Brandy Pettit (another tester) started seeing “pretty trees’ – I started seeing Doritos.


The block came together nicely and it gained the nickname “Doritos and Snow Cones” – which may stick.


My final decision was for the layout – although I had chosen the smallest size (six blocks) – it still would have finished a little too large for me as my quilts have to be able to go on a wall. To add a little more interest, I opted to put the blocks on point (almost like a square-in-a-square block) and inserted a yellow flange (small strip of folded yellow) to help “contain” the design. I will probably do faux piped binding in two colours - the background fabric and either the green or the purple. I think my LAQ – Kristy Ball – will have fun with the large negative space in the corners.


I thoroughly enjoyed the making the pattern and the pattern testing process. I found I really had to pay attention to following the pattern as a beginner would (and not winging it as I usually do) in order to give useful feedback. Having a deadline to give feedback also meant this top got done rather than succumbing to my endless daydreaming through colours/patterns/backgrounds/layouts…etc…
Thanks Jen Shaffer for a new experience and a fun quilt.

***************************

Thank you, Victoria! I love the idea of this quilt being named Doritos and Snow Cones. Hehehe.

I hope you enjoyed this little look into Victoria's process.
Happy Stitching!
Jen

Tuesday, July 11, 2017

Beginners Unite! Strip piecing

This week there will be two shorter posts for Beginners Unite! This first one will have tips for strip piecing and the bonus post will be on Thursday with tips for keeping your points. 


I touched on the topic of strip piecing HERE in the Strips and Squares post. This time we're going to talk about how to stitch multiple strips without getting those frustrating waves.


Start with four strips cut at 2 1/2" x 8 1/2". It's important that any strip you cut is cut accurately. For cutting tips go to THIS POST


Lay your first two strips right sides together. Stitch on the long side.


Note that the blue strip is on top. Press towards either side, making sure to lift your iron and move it. Do not press and move at the same time, this will distort your strips.


Lay another strip right sides together with your newly sewn unit. When you stitch this time, make sure you are stitching the opposite direction. In this case, the blue will be on top again. Press.


Using your last strip, lay it right sides together. Again, stitch the opposite direction of the seam you just stitched. In this instance the white will now be on top. Carefully press.


You should now have a pieced strip that doesn't wave at you when finished. 

Happy Stitching!
Jen

***Tomorrow Victoria from Fabric At Work  is a guest blogger. She's going to share her experience testing Gradient Stars and a little about her on-point version.***

Follow me on Instagram and Facebook for daily shots into the life of PBJ.


1) Intro - May 2 
7) HST - Half Square Triangles (My one true love) - June 13
8) Flying Geese - June 20
9) What about those blocks that are just a tad off? - June 27
9) Strip Piecing - You are here
12) Adding Borders - July 18
13) Sandwich that top - July 25
14) Quilting - August 1
15) Binding - August 8
16) Labels  - August 15

Friday, July 7, 2017

Gradient Stars

Introducing the newest pattern from PBJ: Gradient Stars


Made from 18" blocks, this quilt comes in three different sizes; 46" x 64", 64" x 82", 82" x 100" (above).

It started off as a simple sketch. 


When I put that into a program, I felt it was too simple. 


So I added more. 


Then changed what I added.


When adding color we get this beautiful block that, when put into a full quilt, becomes a beautiful quilt.


Gradient Stars uses two rulers from Deb Tucker's Studio 180 Design (no affiliation). The Corner Beam® and the VBlock®.


When made in just one color the whole pattern changes. 


Enjoy these quilts from the testers.


Karen's version of Gradient Stars is bright and beautiful.


Brandy's quilt adds the coolness of winter with her Santas.


 Julie used this gorgeous grey as her background. It really sets off the stars.


Victoria changed hers up a bit. I love it set on point. Next week she will share how to change up a pattern to make it yours.


Gradient Stars is now available as a digital download from Craftsy and Etsy, at a special price through July 10th. Paper patterns will be available July 10th from Etsy. 

Happy Stitching!
Jen

Beginners Unite! A beginner's quilting series will resume next week on Tuesday!

Find me on Instagram @patternsbyjen and Facebook.