Friday, November 30, 2018

Island Batik Cozy Cabins

This months Island Batik Ambassador challenge was all about the Log Cabin.


Confession I have never made a log cabin quilt. What??!! I know!! I was so excited to get to this challenge and try it out. I designed my own take on the log cabin quilt using two different widths for the strips. All of the products in this post were given to me through the Island Batik Ambassador program, including the Aurifil thread and Hobbs batting. I used the 2 1/2" strip pack of Dear William fabrics as well as yardage for the border and binding.


Shhhhhh! She might be my favorite.


Here's a close up of the quilting.


I love my Frixion pens and use them to do all my marking, on the wrong side of the fabric. I *never* use them on batiks because it takes away the color on the fabric and you never get it back.  For this quilt I decided to try the Hera Marker. After I pinned my layers together I used my ruler and the marker to make lines on my top.


When following the lines you can't see them as the walking foot moves along so you need to look ahead of the walking foot to stay on track.


I also used pins to help me with the stopping point, because they disappear in the sewing machine light.


Here's a close up of the quilting on the border, which is really hard to get by the way. Every time I angled it so you could see the shadow of the quilting the color would go from pink to red. I drew some arrows so you can see the direction of the lines. The lines change direction when they get to the border and only cross in the middle of the border.


I used Hobbs cotton batting for this wallhanging. It quilts like a dream, but you do need a lint roller for when you are done. As with all cotton batting it gets a little fuzzy, but it's super soft and totally worth it.


I used three thread colors from Aurifil to quilt this piece, all 50 wt. Plum: 4030 Forest Green 4026 Very Light Brass 2915

If you would like to make your own Fall Retreat you can find a PDF version in the following places:

Etsy

Payhip

If you share on social media please use #fallretreatquilt so I can see your version!

Happy Stitching!
Jen


New to Patterns By Jen?

Find paper and digital patterns in my Etsy shop.


The Border Quilt Quilt Along is coming September 2018

Follow me on Instagram and Facebook for daily sneak peeks and updates.


Friday, November 23, 2018

November Color Challenge Link Up

The November Color Challenge Link Up is here!


We've almost completed the year and I can't tell you how thankful I am that you have joined me in this color challenge journey! Look for information on what's in store for next year soon!


How did you do finding blue green in your stash? Were you able to find what you needed or did you have to run to the store?

If you made something blue green in November add it to the link below for a chance to win a fat quarter bundle of Haiku 2 from Monaluna Oragnic fabrics. This is beautiful fabric and very easy to sew.


If you are having trouble linking up read this post. If you are still having trouble please email me directly; patternsbyjen(at)gmail(dot)com and I will happily get you added.

Grand Prize

Don't forget, for each month you enter the Link Up, you are also entered for the grand prize at the end of the year:

Jen at Dizzy Quilter is providing the grand prize! 

The generous prize provided is your top quilted by her (up to 90" x 90"),  a $202.50 value!

You must provide the backing, 8" longer than width and length. Batting can be purchased from Jen, for $20, if you like.

Return shipping is included for US residents only.
**Please note, the quilt will not be trimmed or bound, those services are extra**

Happy Stitching!
Jen


New to Patterns By Jen?

Find paper and digital patterns in my Etsy shop.


The Border Quilt Quilt Along is coming September 2018

Follow me on Instagram and Facebook for daily sneak peeks and updates.

Wednesday, November 21, 2018

Border Quilt Quilt Along - Flying Geese Border

Welcome to Week 6 of Pattern By Jen's
The Border Quilt Quilt Along!


We've made it to the last border! Flying Geese is one of my favorite units to make. For tips on making this basic unit see THIS POST.


If you are just finding us, you can still grab your pattern and fabric and join in. With each border there is a two week time period to make the border before we start on the next. You can stop at any point for any size you quilt you like.

Grab your pattern!

Printed: The Border Quilt

Etsy Digital: The Border Quilt

Craftsy Digital: The Border Quilt

Payhip Digital: The Border Quilt


For inspiration see The Border Quilt tester quilts HERE. I am using Enchanted Forest generously provided by Northcott Fabrics. These gorgeous fabrics are in shops now! They are super soft and easy to work with.

***Please note! If you are using them for the quilt along, wait to wash them until you are done with the quilt, or buy extra fabric. Flannel shrinks more than quilting cotton.***

We're going to start off slow for the first few weeks as we get into the swing of the quilt along. We will be doing the center first, I will go over both versions, then a border every two weeks. This will hopefully give you time to work on them a little bit at a time if you need to, as well as get any questions answered. Don't worry about keeping up, this is supposed to be fun, so go at your own pace. Do try to make at least one block for each border as we go so you can ask any questions as they come up.

To get direct help, as well as opinions of others who are sewing along with us, join the Facebook group: Quilt and Learn with Patterns By Jen.

Quilt Along Schedule

July 18 - Intro post


Nov 7 - Pinwheels with a background border

Nov 21 - Flying Geese

Dec 5 - Finishing touches

Let's Get Started!

Flying Geese Border


Chain piecing is your friend no matter how many Flying Geese units you are making.


I use the back of an old cutting mat to do my marking and trimming. I cut it up into fourths for easy to use extras. This keeps my current mat from wearing out so quickly.


Sew the flannel pieces with the seams facing down to help from getting caught under the presser foot. I also lightened the tension on my presser foot to help pull the fabric through more evenly.


Add the Flying Geese border and you are finished! Whoo hoo! **Note the instructions for adding the Flying Geese borders to keep from having to rip.** 


If you share your progress on social media please tag Patterns By Jen and /or use #theborderquiltquiltalong. I can't wait to see your pieces!!!

If you are a blogger who is sewing along please fee free to grab and use this button.


Instructions: Select all code above, copy it and paste it inside your blog post as HTML


Reminder!!  Clean your machine!! Especially if you are using flannel. This lint builds up fast!


 Reminder!!  Clean your machine!!


Here are the bloggers that participated in the Interview Session. Please take a moment to follow them and see their progress. Some will be posting right away, some will be posting during the two weeks between borders.

Becca - Pretty Piney
Joanne - Quilts By Joanne
 Marija - Mara Quilt Designs
Stephanie - Quilt'n' Party


Happy Stitching!
Jen

New to Patterns By Jen?

Find paper and digital patterns in my Etsy shop.


The Border Quilt Quilt Along is coming September 2018

Follow me on Instagram and Facebook for daily sneak peeks and updates.

Wednesday, November 14, 2018

Island Batik Needle, Paper, Scissors

Welcome to October's Island Batik Challenge.


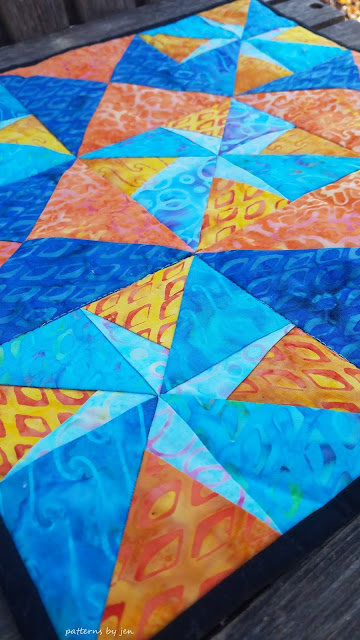
I feel like I'm perpetually behind, but let's pretend like I'm on top of things and enjoy this project. The fabrics in this blog post were given to me by Island Batik as part of their Ambassador program. The pattern, Twirling Star Mini Quilt, was given to me by Leanne of Devoted Quilter.


October's challenge was a paper piecing challenge. As someone who struggles with the paper piecing concept, this was a daunting task. I reached out to my fellow ambassadors for a simple, simple pattern. Twirling Star Mini was perfect, a little paper piecing mixed in with traditional.


I left off the outer border, mostly to save the fabric for another project, but I like it without. I think it makes the perfect table topper size. The fabrics used for this project were from the Ocean Odyssey line.

I quilted my piece in the ditch, but you should check out Leanne's quilting if you have the time, because hers is fantastic.


This little mini came together quickly, even for this novice, and I only had to unpick 2 seams. It's a record for me I think.

Have you done any paper piecing? What are your thoughts, yay or nay?  This piece made me think maybe it's not sooooo bad.

Happy Stitching!
Jen

New to Patterns By Jen?

Find paper and digital patterns in my Etsy shop.


The Border Quilt Quilt Along is coming September 2018

Follow me on Instagram and Facebook for daily sneak peeks and updates.

Wednesday, November 7, 2018

Border Quilt Quilt Along - Pinwheel Border

Welcome to Week 5 of Pattern's By Jen's
The Border Quilt Quilt Along!


You've made it to week 5! How many of you stopped after the last border? That is a really nice size to snuggle under. Stopping after the pinwheel border will give you the perfect size to snuggle with your special someone.  For the next two weeks you will be working on the Pinwheel border. There are a log of HST to make for this border. My suggestion is to sew a bunch, trim, sew, trim, sew, trim over an extended amount of days. This helps me to not get bored with it, but also makes sure I'm not doing the same thing in the same position for too long.


If you are just finding us, there is plenty of time to grab your pattern and fabric and join in. With each border there is a two week time period to make the border before we start on the next. You can stop at any point for any size you quilt you like.

Grab your pattern!

Printed: The Border Quilt

Etsy Digital: The Border Quilt

Craftsy Digital: The Border Quilt

Payhip Digital: The Border Quilt


For inspiration see The Border Quilt tester quilts HERE. I am using Enchanted Forest generously provided by Northcott Fabrics. These gorgeous fabrics are in shops now! They are super soft and easy to work with.

***Please note! If you are using them for the quilt along, wait to wash them until you are done with the quilt, or buy extra fabric. Flannel shrinks more than quilting cotton.***

We're going to start off slow for the first few weeks as we get into the swing of the quilt along. We will be doing the center first, I will go over both versions, then a border every two weeks. This will hopefully give you time to work on them a little bit at a time if you need to, as well as get any questions answered. Don't worry about keeping up, this is supposed to be fun, so go at your own pace. Do try to make at least one block for each border as we go so you can ask any questions as they come up.

To get direct help, as well as opinions of others who are sewing along with us, join the Facebook group: Quilt and Learn with Patterns By Jen.

Quilt Along Schedule

July 18 - Intro post


Nov 7 - Pinwheels with a background border

Nov 21 - Flying Geese

Dec 5 - Finishing touches

Let's Get Started!

Pinwheel Border

For Half Square Triangle Instructions go HERE.


Once you've trimmed your HST and are ready to begin assembling them into pinwheels you can use the chain piecing method. Chain piecing means that you sew each piece, one after another, without cutting the thread in between. This saves time and thread.


I leave mine sewn together like this and bring to the ironing board. I press to one side and then trim the threads in between each unit.


When sewing the paired HST triangles together to form the pinwheel unit I lengthen my stitch length just a bit.


This helps when I need to rip those stitches and spin the seams.


Finger press the seam to keep the fabric from stretching. Even though you have spun the seams you should be able to turn the blocks and get each seam to nest.


Add the pinwheel border and then the next background border. You're ready for the *last* border! Whoo hoo!


If you share your progress on social media please tag Patterns By Jen and /or use #theborderquiltquiltalong. I can't wait to see your pieces!!!

If you are a blogger who is sewing along please fee free to grab and use this button.


Instructions: Select all code above, copy it and paste it inside your blog post as HTML


Reminder!!  Clean your machine!!


 Here are the bloggers that participated in the Interview Session. Please take a moment to follow them and see their progress. Some will be posting right away, some will be posting during the two weeks between borders.

Becca - Pretty Piney
Joanne - Quilts By Joanne
 Marija - Mara Quilt Designs
Stephanie - Quilt'n' Party


Happy Stitching!
Jen

New to Patterns By Jen?

Find paper and digital patterns in my Etsy shop.


The Border Quilt Quilt Along is coming September 2018

Follow me on Instagram and Facebook for daily sneak peeks and updates.