Thursday, May 16, 2024

Accuracy in Quilting - Trimming

 Trimming is one of my favorite ways to make sure my units are accurate before being put into my quilt blocks.


There is nothing more satisfying to me than trimming a unit and knowing that it is now the correct size. When I first started out we were still using the 7/8" method and expecting our units to be accurate. I am just not that perfect of a stitcher. When I discovered how to make the units just a bit larger and then trim them to size, my little perfectionist heart was so happy.

Rulers

I know I've said this before, but rulers from the same company make a difference. If you don't want to invest in a bunch of new rulers, especially not knowing if you prefer one brand over another, see if any of your friends would be willing to lend you theirs to try out. Once you know the brand you like, you can slowly build your ruler set.

When you know that this craft is for you, it is time to invest in specialty rulers. They are made for trimming units like HST (half-square triangle), FG (Flying Geese), SIS (Square in a Square) units and more. There are also rulers for triangles with different angles. I have a list of my favorite specialty rulers on my Favorite Tools page. 


If you aren't sure that you want to continue with this craft, or specialty rulers aren't on the list yet, you can easily use your current rulers. All you need is a Sharpie marker and scotch tape, though truly neither is a necessity if you don't have them.

On your ruler mark the measurements that are important.


For instance for a HST unit, I would mark the trim size all the way around.

For a FG unit I would mark the trim size, but also the mid point so I know where the "beak" of my Flying Goose should be.

Cover the marks with scotch tape if you are going to be doing a lot of trimming, the sharpie will wear off eventually. When you are done trimming, a dry erase marker takes the sharpie right off.

Rotary cutter

Did you see this one coming again? If a dull blade makes a difference in accuracy when cutting yardage, imagine what it will do to smaller units. I know they are expensive, but having a few on hand will make your quilting life more enjoyable. I promise. The blades I use last just as long as the name brand blades, and I've only had one bad blade in all of the packs I have bought.

Spinning mat

A spinning mat can also help with your accuracy when trimming because it allows you to leave the unit as is, and not have to move it. I do not have any experience with them, so I don't have any recommendations, but I know quilters who love to have these.


I use an old cut up mat for my marking and my trimming. This saves my mat from unnecessary wear and tear, and also gives me the option to rotate units without having to pick them up. They aren't pretty, but they work!

If you don't have an old mat to cut up yet, flip your current mat over and use the backside for trimming as a way to save your mat. Be sure to change where you trim, as the cuts will start to stay, even with a self healing mat, if you do a lot of trimming.

This is the third article in the Accuracy in Quilting Series.


Make something extraordinary!


Did you get my 5 Free Tips for Accurate Piecing yet? I would love to send it to you, sign up HERE!


New to Patterns By Jen?


Don't forget to sign up for the Bites of PBJ newsletter while you are here!


Newsletter sign up


2024 Monthly Color Challenge


Find paper and digital patterns in my Etsy shop


Find fun PBJ merchandise at Teespring


Follow me on Instagram


Join the Quilt and Learn with Patterns By Jen Facebook page.

Thursday, May 9, 2024

Accuracy in Quilting - Piecing

Next in our Accuracy in Quilting series we're going to get into the piecing of our quilt tops.


Accurate piecing can be the most frustrating for quilters. While it does take practice there are steps you can take while you are learning to help.

Sewing Speed

Many machines have the ability to change the speed you use when stitching. If you are just starting out, a slower speed will give you more control over your stitching. You can speed up as you grow more confident.

If your machine doesn't have that option, treat your foot pedal just like the gas pedal in your care. Start off slowly, with even pressure. You will speed up as you grow more confident.

Marking stitching lines

In many patterns you will be told to mark a stitching line on the wrong side of the fabric. Marking these lines accurately is important. In this video you can see how I mark my lines.


To help keep your piecing accurate, make sure your lines are drawn accurately. Your lines should go exactly through the corners of your pieces so that your stitching is exactly where it should be.

When stitching strips sew slowly until you get the feel of your machine. My old sewing machine pulled strips through wonky when I used a faster speed, so I needed to use the slow speed. With my new machine I find that faster is better, or the seams get wonky. Taking the time to learn what your machine likes and doesn't like is a great step towards accurate piecing.


Pinning

I have been quilting for over 20 years and I still pin everything. For me, the seams lining up nicely is worth the extra time. You can see how I pin in this video:


While pinning is a handy tool in piecing accuracy, be sure to stay away from running over them. It can throw off the timing of your machine and that is something you would need to bring your machine in for.

Needles

Needles are like rotary cutter blades, we hate to change them. But a dull needle can pull your fabric down into the machine causing stretching or getting the fabric caught in the plate.

Sewing to fit

There will be many times when you have units and/or blocks that are off just a bit. If one unit is 1/8" shorter than the other, it's ok. Pin the ends together and sew with the shorter unit on top. The feed dogs will help to bring in the longer piece. This works with quilt blocks as well. It *does not* work if there is more than 1/8" difference. If that is the case, try to see where the seam is to big, rip that out and try again.

This is the second article in the Accuracy in Quilting Series.


Make something extraordinary!


Did you get my 5 Free Tips for Accurate Piecing yet? I would love to send it to you, sign up HERE!


New to Patterns By Jen?


Don't forget to sign up for the Bites of PBJ newsletter while you are here!


Newsletter sign up


2024 Monthly Color Challenge


Find paper and digital patterns in my Etsy shop


Find fun PBJ merchandise at Teespring


Follow me on Instagram


Join the Quilt and Learn with Patterns By Jen Facebook page.


Thursday, May 2, 2024

Accuracy in Quilting - Cutting

 I want to help you find more accuracy in your quilting so you can piece with confidence.


Over the next five weeks I'm going to share with you my top tips for accuracy in your quilting world. These are the same steps I use when I am making my quilts and it starts at the very beginning with your cutting.

Fabric Prep

You can't expect accuracy throughout your quilting project if your fabric is wrinkled. Press your fabric, whether it is yardage or pre-cuts. It can sometimes feel like you have better things to do, because it is exciting to start a new project and you want to get at it. Taking the time right at the beginning to prep your fabric will make the whole project run that much smoother.

Starch is your quilting accuracy's best friend. It must be done before you start cutting your pieces, because it will shrink your fabric a bit. There are many opinions on what starch to use, what starching technique to use, as well as to use steam or not with your iron. Every quilter has to find what they like the best, what works well for them. 


Here is my process:

I do not wash my fabric, not even flannel*. I use a mist bottle with water to get rid of the worst wrinkles/creases and then I use another mist bottle to starch the whole piece of yardage. I use the hottest setting on my Hamilton Beach iron without steam.

*Yes, flannel shrinks more than cotton, but if I'm using flannel for the entire quilt, then I don't worry about it.


Rotary Cutter

A sharp blade is going to make your quilting life so much easier. We've all been there, picking up our strips and having little pieces still attached. This can pull and stretch your fabric which effects your accuracy. We hate to change those blades, I get it, but it will make a difference. In my list of favorite tools I share the blades I buy in bulk that work really well for me.

Straight Edge

As important as your fabric prep is, the straight edge is the second most important step in your journey towards accurate quilting. I show you how to get the most accurate straight edge in this video:


Taking the time to get a straight edge to start your cutting will make such a difference in your overall accuracy and happiness with your work.


Rulers

When you are first starting out in your quilting journey you may be using rulers from different companies. Once you are able, switching to using rulers made from the same company will give you more accurate results. Why? Lines on rulers can be different widths, which will have you placing your ruler differently. They can also be printed differently between companies. Keeping to the same company with your rulers will make a difference.

Cutting mats

I use my mat to make that first straight edge cut, but after that I use the rulers for all cutting*. Mats, especially mats that are used a lot, can use their accuracy. Lines can get warped from the cuts. It is best to use the marks on your rulers for your measuring and cutting.

*Rulers can also get warped after awhile. The constant rub from the rotary cutter will wear away at the edge of your ruler. It takes years, but eventually you may need to replace them.

We will talk about trimming units and blocks in an upcoming post.


This is the first article in the Accuracy in Quilting Series.


Make something extraordinary!


Did you get my 5 Free Tips for Accurate Piecing yet? I would love to send it to you, sign up HERE!


New to Patterns By Jen?


Don't forget to sign up for the Bites of PBJ newsletter while you are here!


Newsletter sign up


2024 Monthly Color Challenge


Find paper and digital patterns in my Etsy shop


Find fun PBJ merchandise at Teespring


Follow me on Instagram


Join the Quilt and Learn with Patterns By Jen Facebook page.


Wednesday, May 1, 2024

2024 May Monthly Color Challenge Block

 In my little place in the world, May and yellow go together so well.


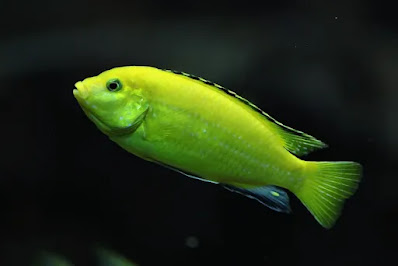
Our challenge this month is inspired by tropical fish. Such beauty lays under the water, it's hard not to be inspired.


This month our color is yellow and we look to the Electric Yellow Lab for our inspiration. Anyone half expect a picture of a yellow dogfish? 😏


From ModestFish Colorful Freshwater FishElectric yellow labs are another popular African Cichlid amongst aquariums for their bold, vibrant yellow bodies with a black stripe along its dorsal fin.
Although peaceful in comparison to some other African Cichlids, electric yellow labs are notorious fin nippers and shouldn’t be kept in a freshwater community tank. This fish should be kept in an African Cichlid community tank with other Malawi species.
You will need a minimum 55 gallon tank with sandy substrate and rockle piles with caves. It’s best to keep one male with several females as males can become aggressive to one another.


Yellow, to me, is such a happy color. I can't look at it without feeling a lift to my spirits.


I'm using Benartex's "Burlap" fabric line. I love the texture of the fabric, sooo much. 


Our featured blogger this month is:

Kathy - Kathy's Kwilts and More

Find her on Instagram

Ready for the  block? It's a super simple block with Flying Geese Units.


Join the Quilt and Learn with Patterns By Jen Facebook group (make sure to answer the questions so I know you are a real person 😉) where you will get a lot of support and questions answered! If you aren't on Facebook you can also follow Patterns By Jen on Instagram. Use #2024MonthlyColorChallenge when sharing so I can be sure to see your block.


I hope my feed is swimming in yellow this month!

Ready to get the pattern? Go to Payhip and download it now! The block is free for the month of May! Each set of instructions includes a "How To" video.

It's too late to receive the January through May block instructions through email, but you can still sign up to have the June - December Monthly Color Challenge blocks (and the layout!) sent directly to your inbox. Sign up HERE.


Let's make something Extraordinary!


Jen


Did you get my 5 Free Tips for Accurate Piecing yet? I would love to send it to you, sign up HERE!

New to Patterns By Jen?


Don't forget to sign up for the Bites of PBJ newsletter while you are here for early releases and sales just for subscribers!


Newsletter sign up


2024 Monthly Color Challenge


Find paper and digital patterns in my Etsy shop.


Find fun PBJ merchandise at Teespring


Join the Quilt and Learn with Patterns By Jen Facebook page.