Showing posts with label Beginners unite. Show all posts

Wednesday, January 17, 2018

Beginners Unite - Square In A Square

I'm adding a little how to for the Square in a Square Unit.


I started thinking that a tutorial for trimming the Square in a Square (SIS from now on) unit might be helpful, since our January block for the 2018 Monthly Color Challenge has one front and center.


Tips for stitching a Square in a Square Unit
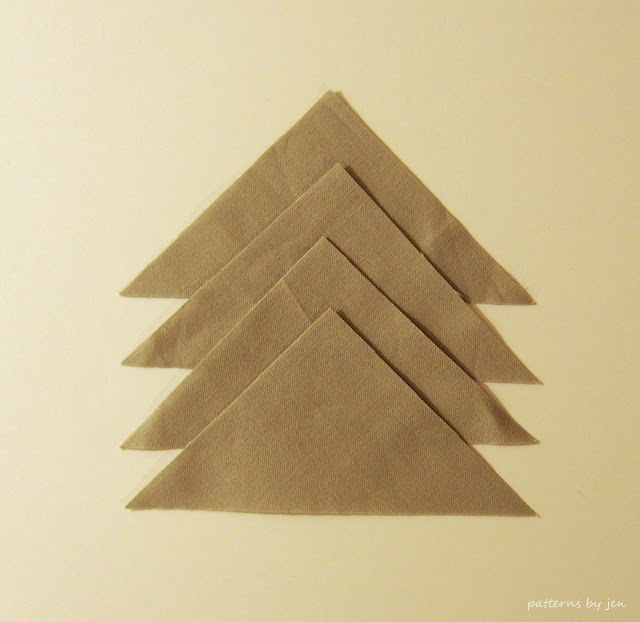


You will need one square and four triangles. I am making a 4" finished SIS for this tutorial. My square is 3 3/8" and the triangles are two squares 3 3/8" cut once on the diagonal.  I like Quiltville's chart for sizes.


The triangles are over sized, meaning in this case we don't have to align centers, we can just eyeball it.


Sew a triangle to opposite sides on the square. Use a scant 1/4" seam allowance. Finding the correct seam allowance is important, I have a post about it HERE.


Press towards triangles.


Repeat with the last two triangles.


Press towards triangles. Give it one final *good* press to make sure you're working with a flat piece for trimming.


Trimming

If you don't have a specialty ruler for trimming SIS, you can still use a regular ruler. This is how I have trimmed my SIS units in the past. Now, I love the Square2 ruler from Deb Tucker's Studio 180 Design.


Find the 1/4" seam allowance, from the top point and right point, and line up your ruler.


You will have a good amount to trim.


Rotate, line up the 1/4" seam allowance as well as lining up your 45 degree angle on the bottom left corner.  Your left and bottom edges should align with the needed measurement. In this case, the 4 1/2" lines.


Perfectly square, with 1/4" seam allowance from each point.


Happy Stitching!
Jen

Don't miss the 2018 Monthly Color Challenge, going on now!

Follow me on Instagram and Facebook for daily sneak peeks and updates.


Tuesday, August 22, 2017

Beginners Unite Quilt Along

The Beginners Unite Quilt Along is almost here!


This first post is just going to talk about fabric requirements and "the plan." You can download the free lap sized quilt pattern HERE. 


Fabric Requirements

Teal -  1 1/3 yard
White  - 1 ¼ yard
Black – 3 ¼ yard
Grey – 2 yards

I will be making my quilt using the Haiku 2 fabric line from Monaluna. 


Teal is the Clover 2 (I used 2 yards for fussy cutting the center)
White is the Shimmer 2
Grey is the Shimmer Lawn

The Quilt Along starts September 5 and will continue every Tuesday through October 31. This will take us from the first cut to the quilting.

September 12 - Cutting (including fussy cutting the center)
September 19 - Center block
September 21 - Look at marking tools
September 26 - Flying Geese week 1
October 3 - Flying Geese week 2
October 10 - Half Square Triangles
October 17 - Corner Units
October 24 - Block Assembly
October 31 - Top Assembly
November 7 - Add borders
November 14 - Quilting and Binding

I hope you will join us in this fun quilt along! To receive email notices sign up HERE. This is a new set up for me, so please be patient as I work out any bugs that may come along.

I've just started a new Facebook group called Quilt and Learn with Patterns By Jen. I would love to have you join. We can share our progress pictures and get questions answered fast.

Happy Stitching!
Jen

**Share your progress on social media using #BUQuiltAlong

Tuesday, August 15, 2017

Beginners Unite! Labels

Welcome to the last Beginners Unite! 


We're talking labels. As with everything in quilting, there is more than one way to add a label. Have I said that before? ;) There really isn't one way to do anything in the quilting world, you will enjoy it more if you do it your way.


Here are the tools I use for making my labels:
Scrap of muslin or light fabric
Heat n Bond, or any adhesive
Pigma pen/marker
Coordinating fabric strip (here I had extra binding, so I used that)


For this particular label I used a 4" x 3 1/2" muslin rectangle. I cut my heat n bond at 3 1/4" x 2 3/4". This gives me a 1/4" seam allowance all the way around plus a little extra. Leave the paper on the heat n bond for now, this helps stabilize the fabric when you are writing.


I write on the muslin before stitching my "border" pieces on, of course I forgot to take a picture of that. I will also stick a piece of lined paper behind the fabric to give me nice straight lines to follow when writing.


 I like to write the name of the pattern, who it's designed by (still trying to find that info for this one, the perils of not finishing something for 2 years), who it's for, then my name and phone number. On the quilts I mail to my photographer I write directly on the back of the quilt with permanent pigma; name of the quilt, Patterns by Jen, my name, address and phone number.
Once I have written down the pertinent information I will attach the borders, pressing out towards the borders.

When the label is written, the borders are on, then I will remove the paper from the heat n bond and attach it to the back of the quilt. I like the back right hand side. I don't know why, it just feels right.


I fold over the border until I can feel the seam allowance in the fold.


I start stitching the label the exact same way I start the binding.


I also stitch 1/4" stitches.


When I get to the corners where the border is folded I make sure to stitch just the border, not the fabric folded under. This keeps that fold under the border and not peeking out the sides.When I get to the end I knot off the same way I do the binding.


Now you have a nice labeled quilt or wall hanging. If you want to add a hanging sleeve to your wall hanging I have a tutorial HERE.


I hope you have enjoyed the Beginners Unite series!  Next Tuesday I will go over fabric amounts for the Beginners Unite Quilt Along! I hope you will join me.

Happy Stitching!
Jen

**Here is the info on the designer of this wall hanging, you may have heard of her, Kimberly Jolly of the Fat Quarter Shop. Follow this link and if you page down to the 2015 March mini, you will find it! Thank you, Pat Sloan, for helping me find my way back to this pattern!**

Tuesday, August 8, 2017

Beginners Unite! Hand stitching the binding

It's time for the binding!


I love hand stitching the binding. It's my favorite part. I love sitting and stitching down the binding. Here is how I do my binding.


First we need to square our quilt. While I am showing you on a  wall hanging, I do the same thing for any size quilt I am putting binding on. It is important to have square corners and straight borders. 


Find a place to measure from. With this wall hanging, it's easy, I'm just going to use the border for my measurement. Here I'm using 1 3/4" as my mark.


I use this same measurement all away around. When marking the cutting line, I also make sure the cut I made before is straight as well.

Once the quilt is squared measure your sides and add them all together. For this one it is 13" x 18". 

13
13
18
+18  
62
Once I have this number I'm going to divide it by the width of fabric (WOF). I always use 40" as my go to.

62/40= 1.55


This is how many strips I need to cut for my binding. I take that number and multiply it times the width that I cut my strips. I cut my binding strips at 2" wide. Since I will be cutting two strips I multiply 2 x 2 and know I need 4" x WOF. Find information for Accurate Cutting here.


Place your binding strips right sides together (RST) as shown. Leave 1/4" edge of both strips over the end. 


Stitch from one corner to the other. 


Trim 1/4" from seam.


Now press the binding in half. Years ago I read in a magazine (I don't remember which one) that it's better to press the binding with it hanging over like this, and not have it stretched out along the length of the ironing board. Something about stretching and pulling. 


Press the seams to one side, not open.


Ilike to roll my binding up, it's easy to keep from getting bunched up and knotted. You can also put it in a bag and have it come out slowly. Side note: it's important to know how to get the correct amount for your binding or you will end up with a baggie like the one pictured. That is a sandwich sized bag filled with a long strip of binding. That binding is leftover from the first TWO twin size quilts I ever made. Yes, that is how much extra I made. It was funny then, and still funny now! I hope you have funny quilting stories to tell, but hopefully, not binding if I've done this right!


I leave about 6" when starting to attach the binding. Here is a video to help show how I do the binding. I believe it's easier to watch than to try and do pictures. 


Here is Part 2 of the Binding Tutorial, because YouTube editor wouldn't let me go over 15 minutes. Since I have limited knowledge of video editing, and my family was headed out the door for a family day at the time of this upload, it stays in two segments until I can come back and figure it out. Thank you for understanding!


Do you hand stitch or machine stitch your binding? Let me know in the comments!

While this was the last planned post for Beginners Unite, I'm going to add one more to the list. Next week Tuesday I'll show how I put on my labels.  Don't forget we are going to have a Beginners Unite Quilt Along beginning the first Tuesday of September. More information in the next couple of weeks, but you can check out the quilt we'll be making here: Here a Square, There a Square. It is currently a free lap sized quilt pattern.

Happy Stitching!
Jen


1) Intro - May 2 
7) HST - Half Square Triangles (My one true love) - June 13
8) Flying Geese - June 20
13) Sandwich that top - July 25
14) Quilting - Aug 1
15) Binding - You are here!
16) Labels - August 15

Tuesday, July 25, 2017

Beginners Unite! Sandwiching your quilt top

Your top is pieced and you are ready to quilt it.


As with all things quilty there are different preferences for sandwiching your quilt top. I'm going to show how I sandwich my tops. I cut my backing and batting a few inches larger than the pieced top. I don't do the full four inches all around that long armers require, but that's because I quilt on my domestic machine.


I pin all my tops, lap size to wall hanging. I use masking tape, curved safety pins and the awesome Kwik Klip (no affiliation). I don't use spray baste. I know some swear by it. I don't because 1) I've never had success with it, my fabric always slides and shifts and I end up in tears and 2) I live in Minnesota, the only time I can use spray baste with proper ventilation is about 2 months out of 12. Really. It's either forty below or 80% humidity. (I say that with love, there is no better place for living the four seasons than Minnesota!)


When I quilt wall hangings, I piece my batting. I know it's not going to get washed so I just zig zag the pieces together. 


Make sure you have nice straight edges, keep the seam in the middle and stitch. I use a 2.5 stitch length and 3.5 zig zag.


Lay out your backing, making sure it's nice and smooth. I'm showing a wall hanging, but I promise, I do this for the lap size as well, on my floor, which is going to end soon, because it's getting harder and harder to get up off the floor. Place piece of masking tape in the middle of one side, then making sure your backing is smooth and a little taut (no stretching) place another piece, exactly opposite,
on the other side.


Next, place a piece on either side of the middle tape, and across on the other side.


Then again, on the other side of the middle piece of tape, and again, across on the other side.


Repeat on the top and bottom.


Then smooth your batting over the backing and tape as you did the backing.


Lay your top over the layer and begin pinning from the center out. Pin every four inches or so. I just pin whatever looks right. Which, really means, I over pin. I'm a big believer in pinning. They are my favorite quilting tool for accuracy.

Don't miss any of the Beginners Unite! posts and make sure you come back for the August 2nd post for an exciting quilt along announcement! I'm moving the next Beginners post one day, because the August Muggamo pattern comes out on Tuesday.

Happy Stitching!
Jen


1) Intro - May 2 
7) HST - Half Square Triangles (My one true love) - June 13
8) Flying Geese - June 20
13) Sandwich that top - You are here
14) Quilting - August 2
15) Binding - August 8
16) Labels - August 15

Tuesday, July 18, 2017

Beginners Unite! Adding borders

Surprise! I added a topic, because I realized when I was writing the post on how to sandwich your quilts I hadn't talked about the borders.


Have you ever put borders on your finished top and ended up with waves? It can be so frustrating to have a beautiful top end up with bunched up borders, or sides that are waving at you. This can be easily avoided, and easily fixed if it happens. 

Designers give you measurements for your borders, but it is important to measure your top first, before cutting to those measurements. 

Here is how I put on borders. This is on a smaller scale, but it is the same for larger quilts, too. 
If you are putting on the side borders, first measure vertically. You need three numbers:


Left


Middle


Right


Write those measurements down. Add them, and then divide the total by three (finding the average means you divide by the number of measurements you've taken).


In this case the number is 8.458333333333, so I am going to cut my piece at 8.5" because it's close enough it won't make a difference.


I'm going to pin my border on. First I put a pin in each corner, then I pull the whole thing taut (do NOT stretch) and pin in the middle. Once I have those pins in I will pull the fabric between one corner and the middle pin taut and pin that middle. Repeat for the other side. In a larger quilt, you will use more pins. Pinning keeps the fabric from stretching and becoming wavy.


To add the top and bottom borders you will do the exact same thing, but take these measurements:


Top


Middle


Bottom. 

Add those three numbers, divide by three and use that number to cut the length of your border. Pin, stitch and press. Remember to lift and press, not push and press, that will cause wavy borders, too, by stretching the fabric.


You now have beautiful borders to frame your beautiful top. This block is a test block from Softly Circled. I made one and quickly decided the block needed to be bigger or it was going to send me to the loony bin way earlier than I have planned.

As in all things quilty, there are many ways to measure and add borders. You will get different advice from many different people. This is what works for me, I encourage you to use different techniques to find what works for you!

Happy Stitching!
Jen


Follow me on Instagram and Facebook.

1) Intro - May 2 
7) HST - Half Square Triangles (My one true love) - June 13
8) Flying Geese - June 20
11) Is there a trick to keeping those points? - July 13
12) Adding borders - You are here
13) Sandwich that top - July 25
14) Quilting - August 1
15) Binding - August 8
16) Labels  - August 15