Thursday, September 22, 2016

Lake Oahe Walleye - A Blogger's Quilt Festival Home Machine Quilting Entry

Amy at Amy's Creative Side is hosting the Blogger's Quilt Festival 2016. She allows up to two entries, and I am sharing my second entry with you today. There are eleven categories, so go check out all of the amazing and inspiring entries, and find out how to win prizes. (Don't forget to vote!)

My entry for the Home Machine Quilting category is my Lake Oahe Walleye. Designed and made for my father-in-law,


I laughed, cried and swore over this thing. It was one of those quilts you felt you should bring to church and have them pray over after you had finished, or at least burn some incense. You know, just in case.

It kept me hopping all the way to the end, even to attaching the binding. I cut off a corner and had to rip the binding out, cut off the piece that now had a hole in it, sew in a new piece and *then* finish attaching the binding. 

You can kind of see the ripples around the legs of the bridge.

The bridge is my artistic interpretation of the bridge in Mobridge, South Dakota that crosses the Missouri river. I decided it would be easier to stitch most of the bridge and only used fabric in the larger areas. 


I used my walking for most of the bridge. 


Plus, lots of zig zags.


The sky is just one piece of fabric and I searched for a long time for quilting designs that would make you think of wind and sky and clouds. 


I used a couple fabrics for the water, and wanted to make sure that I was quilting water, not waves, but the movement of water. I think the movement shows up a little better from afar. 


I also put in some weeds at the bottom, a couple little minnows that didn't come out particularly well, and knots in the wood. 


I used some landscaping fabric that had bricks, but I also chose to quilt in some pebbles along the bottom. 


The walleye was composed of a few different fabrics, some of them I used the wrong side of the fabric, and then quilted to help make him look fishy. 

I've been told you can tell it's a walleye because of it's eye. I'm not sure if it's true, but I'll take it. 

The borders were a challenge, simply because I don't do a lot of quilting, and I felt that the borders should each be done differently. 


Border 1 and 5 ended up being quilted with the same pattern, though. They are a small 1" border, and I didn't have a lot of ideas for it. 


Border 2.


Border 4. I did more marking on this quilt then I had or have ever done. In fact, I never mark quilts, but this one was important. :)


It turned out better then I could imagine, which doesn't usually happen, things are always better in my head, and should probably stay there. Lake Oahe Walleye, though, was totally worth the tears, blood, sweat, goosebumps and joy. :)

Colors are more true in this picture, you just can't see the quilting as well.

Thank you for stopping by! Don't forget to visit the other entries and spread the love. 

New to PBJ? You may like to check out my Picked By Jen section and/or find out a little bit more about me here and here. I have a couple of free patterns, here, one that would be a quick sew if you need something for fall. My first entry is here. Thank you so much for stopping by!


Happy Stitching!
Jen

Wednesday, September 21, 2016

Frayed Edges ~ A Blogger's Quilt Festival Original Design Entry

 Amy at Amy's Creative Side is once again hosting the Blogger's Quilt Festival. This is the first year I have joined in the fun, and I am entering my Frayed Edges pattern into the Original Design category.


Frayed Edges is one of those quilts that started off as one idea and then morphed into it's own beautiful self. I start all of my patterns on graph paper, so when I put them into my program, currently the old EQ5, I will find that the original design causes a much better second design, which then becomes THE design. In this instance, those half square triangles were actually in the middle of the block, but when the block was put into the program, they ended up framing the squares beautifully.


To see other colorways from my testers you can find the original post here.

When I sent the quilts to the photographer I had every intention of having the red quilt as the front cover quilt. I love the red, but the blue won out, simply because of the bright, crisp feeling it gave off.

My photographer, Kelly, is such a huge contributor to PBJ. She not only takes amazing photos, she also sews amazing clothes. You can find her here. She lugs around a million pounds of fabric, otherwise known as quilts, multiple days to multiple locations, just to grab the perfect shot to show off the quilt.


When the quilt is bigger then the chosen spot, or...


when the sun doesn't cooperate (as in, shines fully on the quilt when just moments before it was behind clouds), she will still get that perfect shot. She makes me look good. 


This quilt comes in three sizes: 56x74, 74x92, 84x111
The blue and white was quilted in an allover snowflake pattern, the red in a floral.
You can choose to fussy cut the center squares (as I did for the blue and white) or follow the strip piecing as I did for the red.

Make sure to go back and check out the other entries and vote for your favorite!


New to PBJ? You may like to check out my Picked By Jen section and/or find out a little bit more about me here and here. I have a couple of free patterns, here, one that would be a quick sew if you need something for fall. Thank you so much for stopping by!

Happy Stitching!
Jen

Monday, September 12, 2016

Cloud 9 New Block Blog Hop

Welcome to the Cloud9 New Block Blog Hop, hosted by Cheryl of Meadow Mist Designs, Yvonne of Quilting Jetgirl and Stephanie of Late Night Quilter. Using the Organic Cirrus fabrics from Cloud 9 (shown here in one of the Christmas gifts my daughter made me, Mom brag!) designers from all over the globe designed a 12" finished block to share with you. 
You are in for a treat!


PBJ is just one stop on this amazing blog hop, so please make sure you stop by the other blogs that will be listed at the end of this tutorial. You will kick yourself if you don't!

My block, Lassi, derived it's name from the first letters of the colors used (yes, I totally copped out on the naming of this block, and I'm not afraid to admit it), Lilac, Amazon, Sky, Shadow and Iris.


This was really fun to design and make, I hope you enjoy it.
To get the PDF version click here.

CUTTING

Shadow - Cut two 4 1/2" squares, cut twice on the diagonal
Amazon (darker blue)- Cut four 4 1/2" squares, cut once on the diagonal
Sky - Cut four 2 5/8" squares
Iris (darker purple) - Cut sixteen 2 3/4" squares
Lilac - Cut eight 3 1/2" squares

INSTRUCTIONS - note: tutorial is in a different order then the PDF file. 

I am using fat quarters for this block. I folded them so that they measured 18 x 11. 
First, I cut a straight edge along the 18" top.


Then I cut a straight edge along the 11" left side ( I am right handed).


All of the fat quarters get squared off like this, and then I cut all my pieces starting from the left.


We are going to start by making the flying geese units. These units will be over sized and we will trim them down when they are pieced.

After I have cut my 4 1/2" squares of Shadow, I need to cut them on the diagonal twice. 
This is my first cut:


Second cut:


When separated you should have four triangles:


For the Amazon square, I will only cut once on the diagonal:


The last piece needed for the flying geese blocks are the Sky squares:


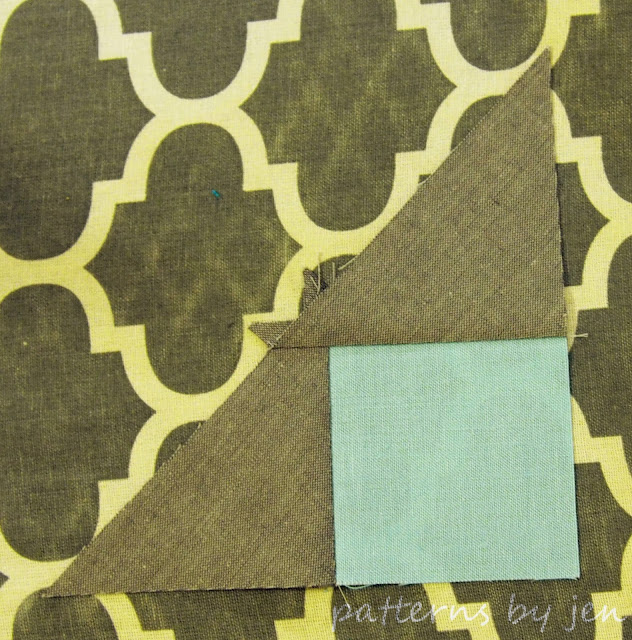
Your first step is to add the Shadow triangles to your Sky squares.


Press towards the triangle.


Add the next Shadow triangle, paying close attention to which way it is turned this should look like a large right triangle. 


Press towards the triangle.


You should have a nice straight edge where the triangles meet.


Next we are gong to add the Amazon triangles.

Flip the pieced triangle over the Amazon triangle, remember these are over sized, so you should have extra fabric on either side. Just eyeball the center, it doesn't need to be exact.


Stitch and press towards triangle.


Add second Amazon triangle.


Next we will trim them down to 3 1/2" x 6 1/2". I use the Wing Clipper. (LOVE IT!) Excuse the freaky reflection, I hope you don't have nightmares!


Next we have our "diamond" blocks. These use the Iris.


We will be marking the diagonal on the wrong side of each square.


We will also be using our Iris blocks.


Sew an Iris square to an Lilac square, stitching just inside the drawn line (so you are closer to the corner then the middle).


If you are interested in using up those extra corners we will be trimming off, follow the next set of instructions, otherwise, press towards the triangle and trim off excess.

Mark a second line 1/2" from the line you just stitched.


Stitch just next to that drawn line, this time closer to the center then the corner.


Cut 1/4" from the seam.


Now you have an extra half square triangle. 

Remember, this is EXTRA. You can use it in another project, or I like to piece a block to add to the back of the quilt.

Repeat with a second Lilac square. Here you can either draw the extra line to get more half square triangles, or just press towards the triangle and trim the excess.


Your diamond block.


Next we will make the block.

The center comes first, and you will use four of your diamond blocks.

Position as shown, you will need two of these.


Stitch down the center and press to the side.

*Hint* Slow your stitching down as you go over this seam. The seams should be going the same direction, so there is a lot of fabric there, but I have found just slowing down allows the machine to walk over it fairly easily.


Stitch the center seam. 

I completely forgot to take pictures as I put my rows together. Whoops! I stitch my block top, middle, bottom and then stitch those rows together. Rows 1 and 3 I pressed out, Row 2 I pressed towards the center. You can do it however you prefer.


LASSI

Don't forget to check out the hosts, because there were blocks shared yesterday, and there are more blocks coming tomorrow!  It's like Christmas, your birthday, my birthday and Santa Claus' birthday all wrapped up in a big fat quilt! Did I mention there are prizes? I told you it's your birthday.

Happy Stitching!
Jen  

Check out today's featured blogs:

Sarah @123 Quilt
Jennifer @RV Quilting
Amanda @Quiltologie
Stephanie @Quilt'n Party