Wednesday, April 29, 2020

Spinning Bow Ties Quilt Along ~ Half Square Triangles

The classic Half Square Triangle (HST) unit is my favorite unit to make, but it wasn't always.


When I first started making HST I struggled to find an accurate way to piece them. Then I discovered the trick of making them larger and trimming them down to size. Game. Changer. I want to share few tips with you for this part of the Spinning Bow Ties Quilt Along.


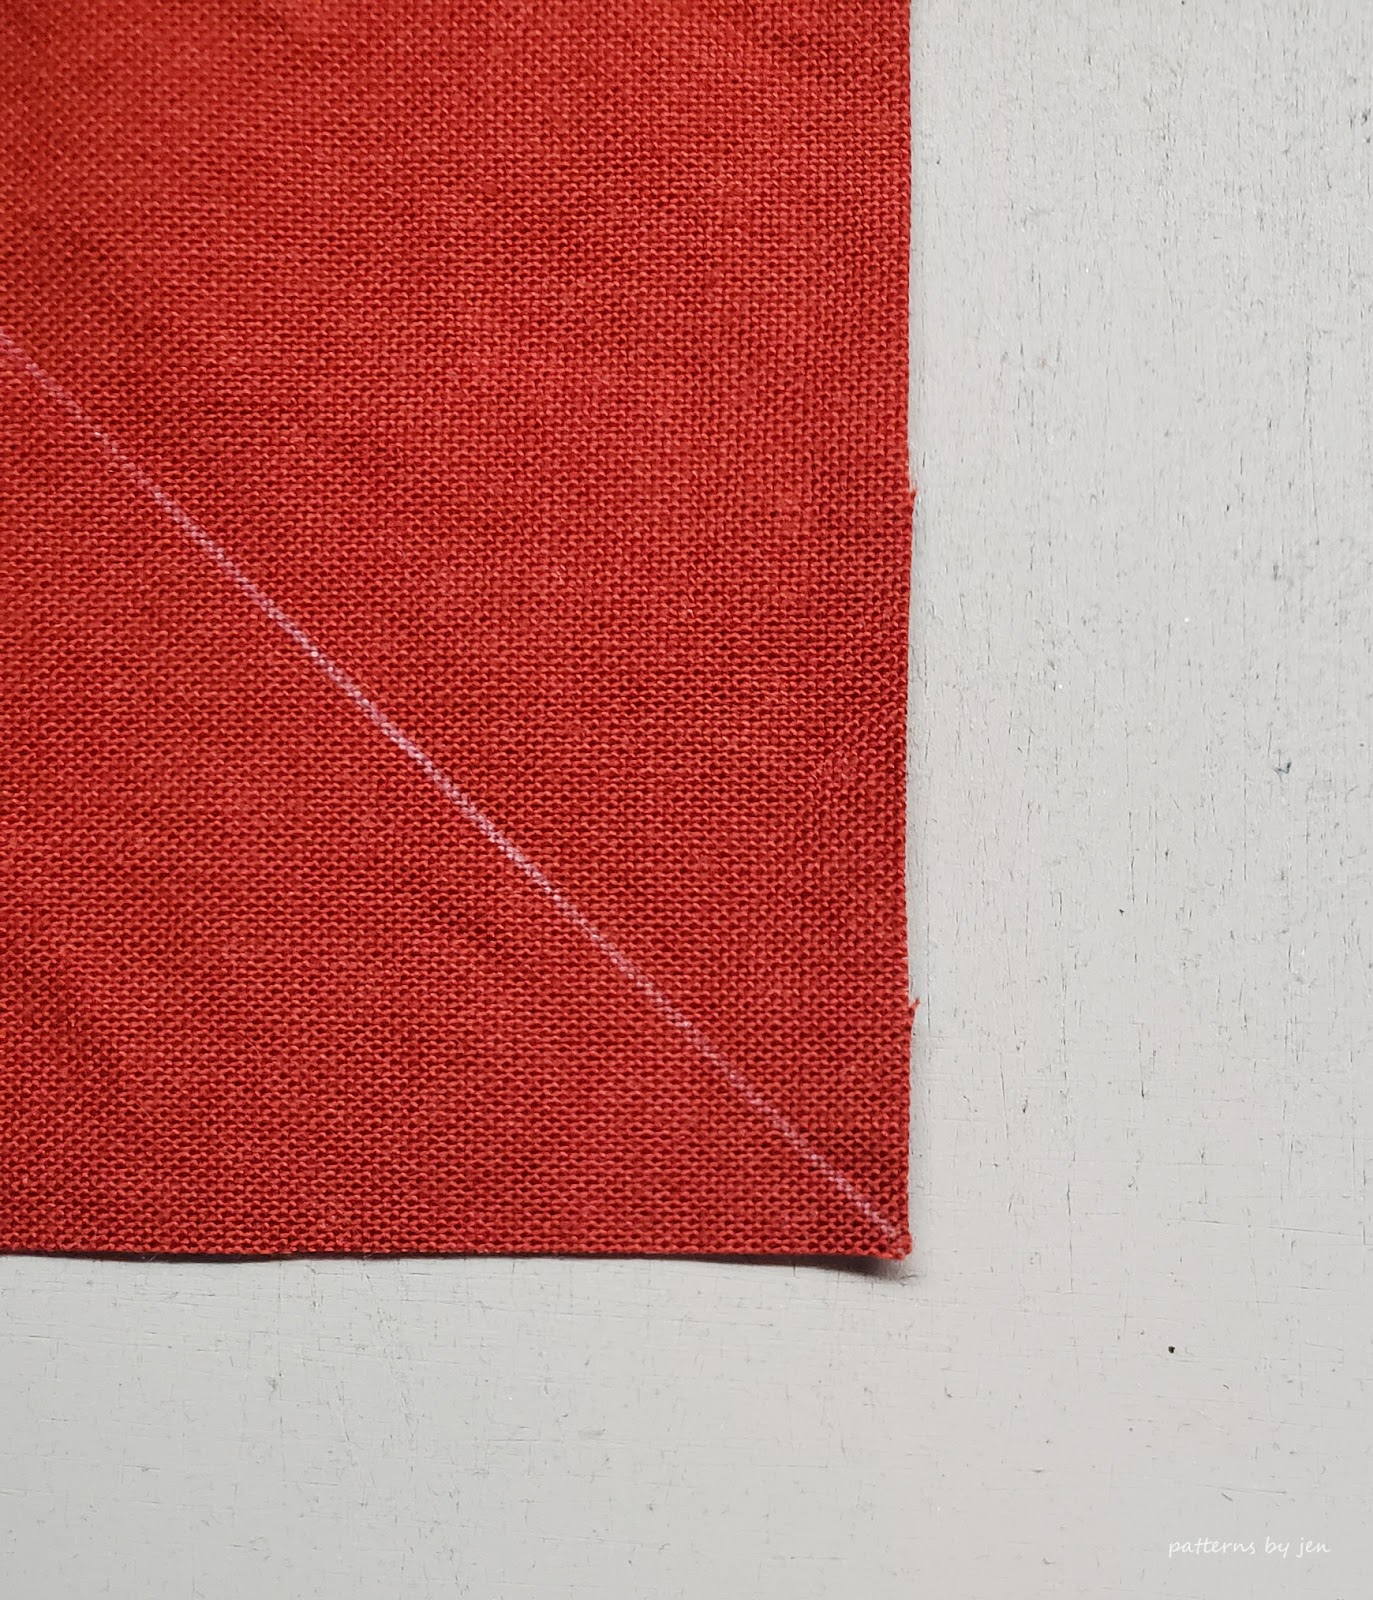
When you line up your ruler to mark the diagonal on the wrong side of the fabric you want to have the ruler just off the corners.


That way, when you draw the line, it goes from corner to corner and not off to the side a bit.


This little video may help if you find your fabric gets pulled into the plate of your sewing machine.


There are other factors to consider if your fabric gets pulled into the plate, the most important of which is your needle. Is it the correct needle (raise your hand if you've gone from sewing knit clothing with a ball point needle to quilting fabric and forgot to change the needle) and when was the last time you changed your needle? If your needle isn't sharp it will push the fabric instead of going through it neatly.


I have a quarter inch foot for my machine. When sewing 1/4" on both sides of the line I drew, I make sure the outside of my foot is ON the line.


When I get to the end I keep my needle down and line up my next HST.


I move my next square up so it overlaps the square I just stitched on, and the drawn lines are also lined up.


Once it's lined up, I put the presser foot back down and start sewing. I continue on that way until I'm done with the pile. If I have a lot to make I will split the piles up so that I can stitch and trim and then go back to stitching. This helps get me moving a little bit and not stuck in one spot.


Once I'm done sewing on the first side of the drawn line, I take my sewn squares and stitch on the next. I do NOT clip them apart yet.


Sew 1/4" from the line again, all the way to the end.


Keeping your needle down, lift the presser foot and line up the drawn line again, just as you did before, and continue stitching.


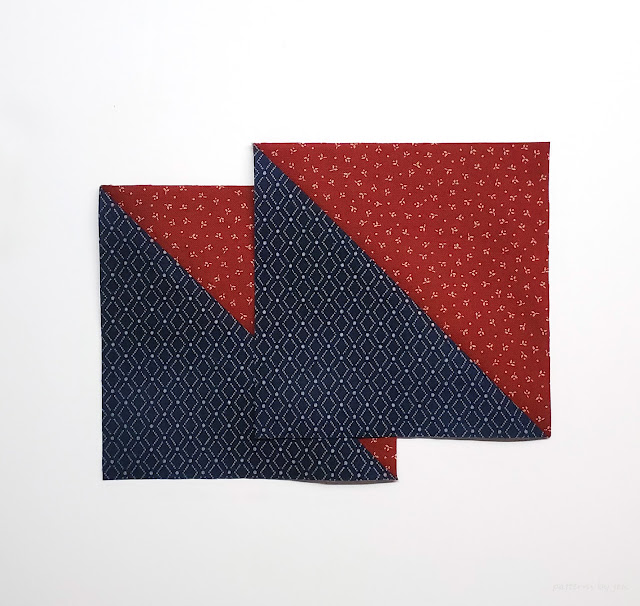
You'll have a nice row of squares.


Now you can clip those threads.


Next line up your ruler so that you can just see the drawn line.


Cut on that line.


Press to whichever side the designer tells you, or that you feel like pressing to, even open. I do recommend, unless told otherwise by the pattern designer, that you press all the same direction. That way if you have to match up those seams they will nest together nicely.


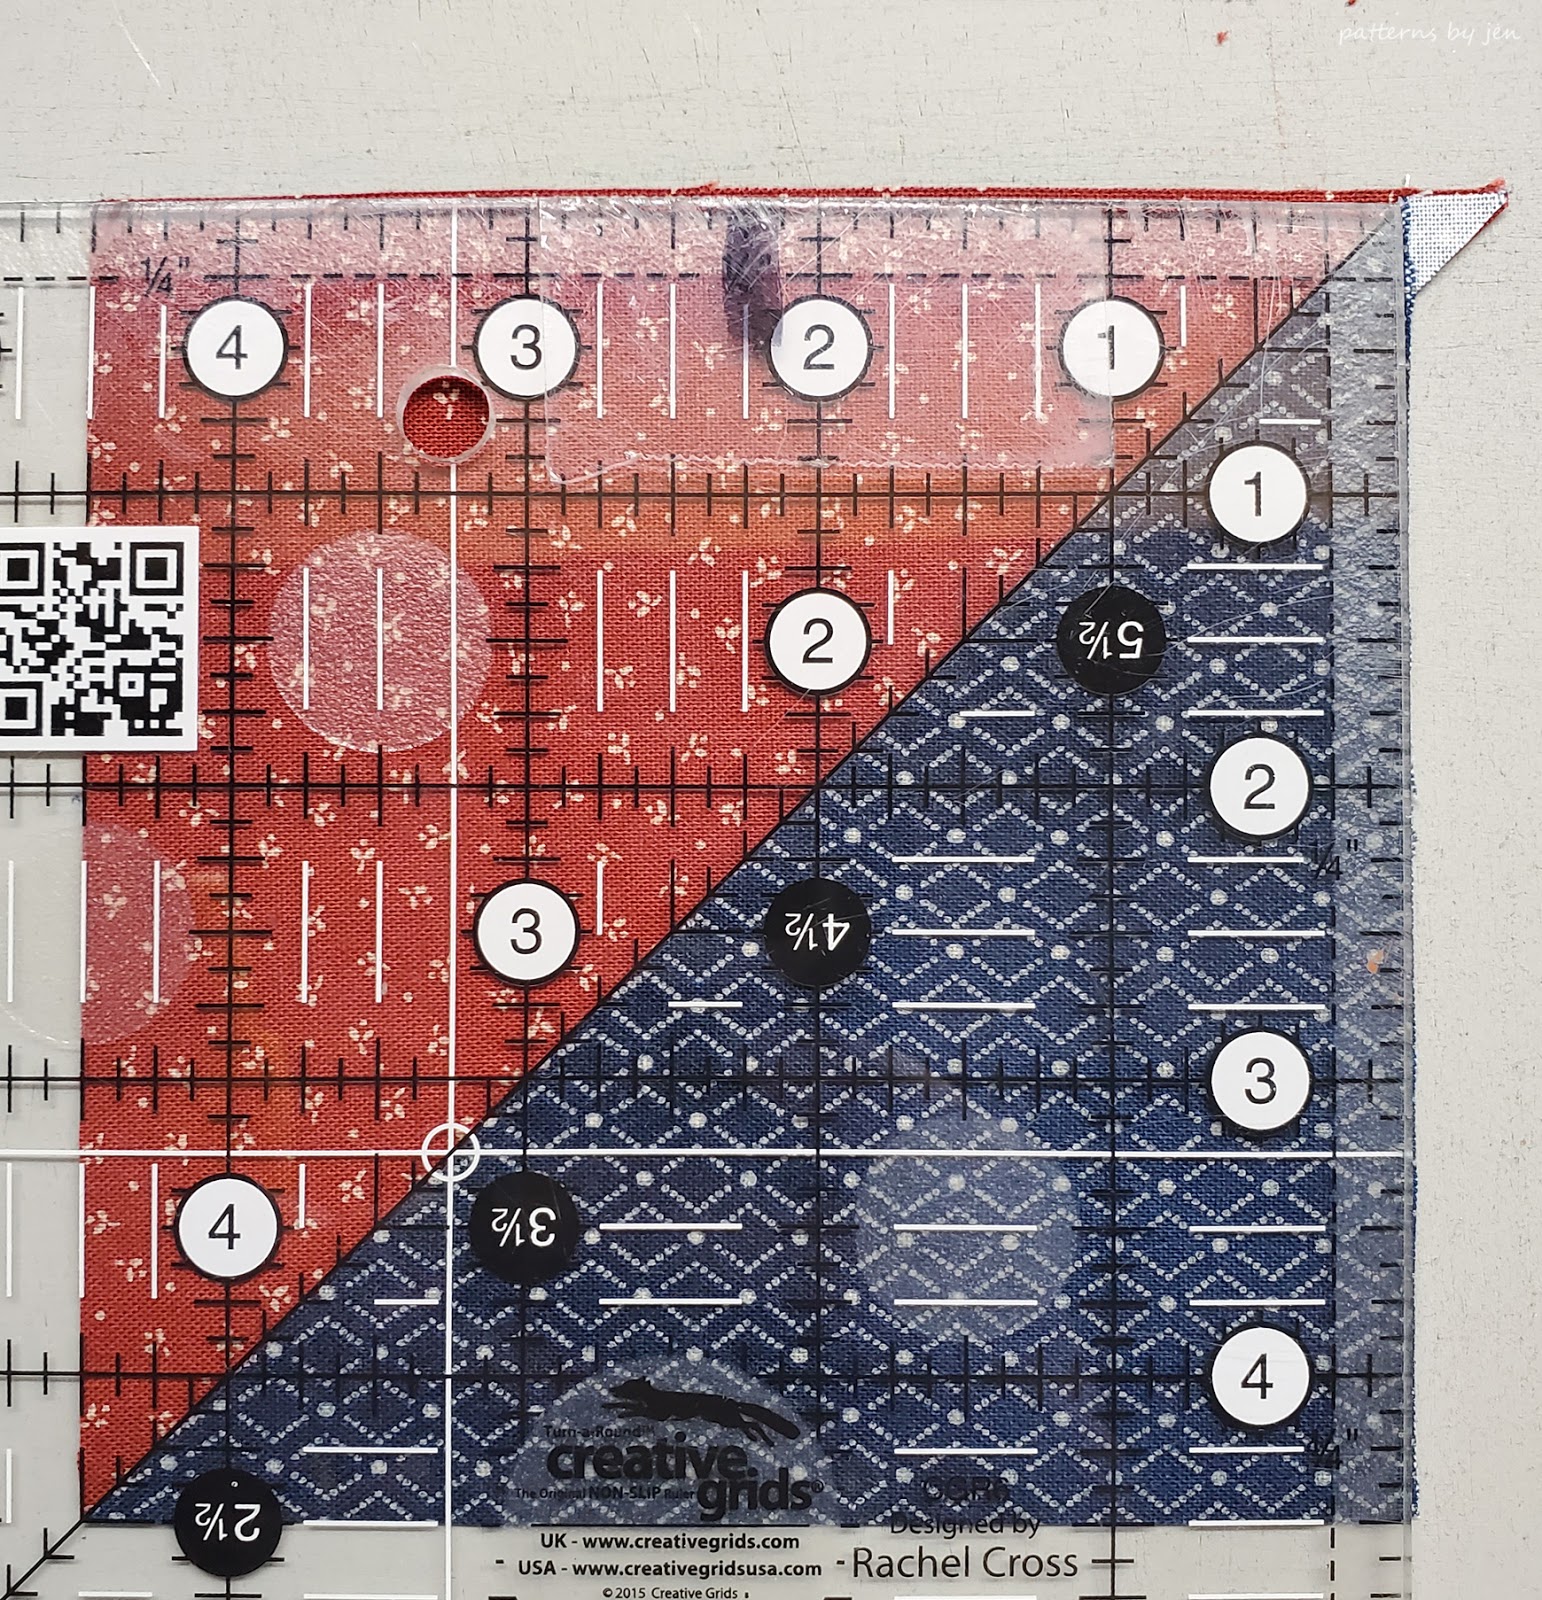
We are ready to trim. For the first trim, make sure the diagonal on you ruler is on the sewn seam, then make sure you are leaving a little on the outside of the ruler to trim off. BEFORE you make that trim....


...make sure your diagonal is on the seam, all the way down the square and that you have fabric outside of the size you need to trim the squares to. Here I'm trimming this HST to 4 1/2" so I'm making sure there is extra fabric to the side and bottom of that 4 1/2" mark on my ruler.


Trim off the side and top.


Rotate your square, make sure the 45 degree line on your ruler is on the seam from corner to corner.


This time you want the ruler to line up on the fabric at the 4 1/2" mark on the side and bottom.


Trim the side and top.


That's it! You now have accurate HST units to work with.

Get sewing and we'll see you back here next week to put our blocks together! If you want to show off your HST units, add a picture of them to the link up below. Thank you for joining the Spinning Bow Ties Quilt Along!


Happy Stitching!
Jen


New to Patterns By Jen?


Find paper and digital patterns in my Etsy shop.

Find fun PBJ merchandise at Teespring


Join the Quilt and Learn with Patterns By Jen Facebook page.

Follow me on Instagram and Facebook for daily sneak peeks and updates


You are invited to the Inlinkz link party!

Click here to enter

Friday, April 24, 2020

April Monthly Color Challenge Link Up

We're linking up for April!


This month has been so fun for me. Purple is my favorite color, so to see my group filled with purple blocks just made April so great for me.


Thank you for sewing along with the Monthly Color Challenge! You may not know, but "in real life" I'm a family child care provider. Right now my house is full of children whose parents are essential workers and my time is spent cleaning more than sewing. I have loved being able to live vicariously through you. Thank you so very much.


Sponsors April thru June

Quilters Chic - PDF Pattern
Said With Love - PDF Pattern


Quilter Dream Batting - Dream Poly 60" x 60"
Cherrywood Fabrics - Two $40 gift certificates
Warm Company -  100 Warm - 100% Natural Cotton 55" x 60"


Island Batik - Garden Party Fat Quarter Bundle
Patterns By Jen -  PDF pattern and Superior Thread S - Fine 50


Our sponsors are new for the 2nd quarter, but the giveaways are still awesome! Please take a moment to visit them and see what they offer. ☺


The link up is open through April 30th. If you have a problem linking up, please use the "question mark" button next to the log out button. If you are trying from your phone, try it from a laptop/tablet if you have one.


2nd quarter giveaway winners will be chosen July 1st. Good luck and thank you so much for stitching along with me!

Missed the block? Find it HERE!

Happy Stitching!
Jen


New to Patterns By Jen?


Find paper and digital patterns in my Etsy shop.

Find fun PBJ merchandise at Teespring


Join the Quilt and Learn with Patterns By Jen Facebook page.


Follow me on Instagram and Facebook for daily sneak peeks and updates. 


You are invited to the Inlinkz link party!
Click here to enter

Wednesday, April 22, 2020

Spinning Bow Ties Quilt Along - Cutting

You've chosen your fabrics and now it's time to start cutting them into pieces that we get to sew back together.


If you are just joining us for the quilt along these links will be helpful.

Spinning Bow Ties Quilt Along Announcement

Spinning Bow Ties Quilt Along - Fabric

Buy the pattern here:

Etsy

Payhip

If you are a beginner you will find more helpful links in Beginners Unite.

Fabric Prep

You've picked your fabrics, what now? The first thing is to decide if you are going to wash them or not. This is a personal choice for each quilter. I choose not to prewash my fabrics, with a few exceptions. One of them is when I'm working on something like a Quilt of Valor quilt and there are reds and whites involved.

Whether or not I choose to wash the fabrics, when I press I use starch. This is another one of those things that is a personal choice. I use a mister and Best Press. There are different starches to use, you can even make your own, use (or don't use) what works for you.

Pattern Prep


When I get ready to cut out a pattern I go through and highlight the numbers I will be cutting. Yes I do print out the digital pattern to do so. Sometimes it can get confusing when you are making multiple cuts with multiple fabrics, so having them highlighted helps to keep things straight. I also go through and write the fabric next to each color to make sure I don't get confused.

Cutting

Now we're ready to start cutting our fabrics. I like to start at the very top and cut everything out for that color, then continue on.


The most important thing to do when you start cutting is to make sure you give yourself a straight edge. You can see more about cutting fabric in THIS POST. As the picture shows, the red fabric was not cut on the straight of grain, which is pretty much impossible when coming off the bolt. So it's important to get that fabric lined up properly.


When the instructions call for sub-cutting strips, I try to sub-cut as many strips at the same time as I can. I don't stack strips, it's not something I was ever able to do accurately, so I line them up as shown above.


If instructions call to mark the diagonal, or cut a piece in half, I do that right away. First cutting out the strips, then the squares, then making the marks or cuts, before moving onto the next cutting step. This way I'm ready to start sewing as soon as I've made that last cut.


My current favorite marking tools are the mechanical pencil and the Bohin Fine pencil with refills, found by one of my good sewing friends. It's great for marking dark fabrics. Above you can see the mat I use for all of my marking. It's a old mat that I cut up into four sections. I use them for marking and trimming, that way I save my good cutting mat for cutting.


 I usually keep my cuts in a shoe box sized bin. That way it's all together and I don't lose any pieces that try to hide in my studio.


I wait to cut the borders until I have the top completely pieced so I can measure for accuracy. I recommend you do the same. We will talk borders in a few weeks.

Link up a picture of your cut fabrics for fun!

Happy Stitching!
Jen


New to Patterns By Jen?


Find paper and digital patterns in my Etsy shop.

Find fun PBJ merchandise at Teespring


Join the Quilt and Learn with Patterns By Jen Facebook page.


Follow me on Instagram and Facebook for daily sneak peeks and updates. 


You are invited to the Inlinkz link party!
Click here to enter

Tuesday, April 21, 2020

Introducing Braided Chain!

Braided Chain is the newest pattern from Patterns By Jen, but it was a long time in coming.


Braided Chain was sent to the testers over a year ago, it may even be two years now. Once the testers had gotten their quilt tops together I realized it wasn't really what I wanted. It just wasn't "right."


I put it on the back burner and moved forward with other patterns, but it finally made it back into the testing line up in February. This is what I envisioned.


To quilt the above quilt I used my walking foot and matched the thread for each color column. Then simply did a straight stitch following the column.


With instructions for 5 different sizes you are sure to find the perfect size. The trouble will be deciding what colors you want to use. You may have to make multiple quilts. *wink*


Braided Chain 41" x 45"

I also used my walking foot to quilt the second version of Braided Chain. This time I used the wavy stitch on my machine. I chose to match the thread with the teal fabric. I "eyeballed" the lines to make the quilting go faster, so they are not evenly spaced, but I think it turned out nicely.


Braided Chain Tips

The hardest part of this pattern is getting those points and corners to match. You can get 20 in a row perfect and then the next 5 are "off." You can see in the above picture that I left the "off" ones alone. If they are 1/8" or less I would encourage you to let them be. Once quilted, washed and used you won't notice them.

When picking out color, if you are planning on a gradation of the pattern, make sure there is enough difference in value. If you can, check your colors in natural light. My first run of the quilt (shown below) did not work because the values were too close.


Tester Quilts

Lets look at the tester quilts!

If you are a quilter you have probably experienced taking quilt pictures on a windy day. Yes? Sometimes you get the shot...


...and sometimes the wind wins. Sherry's quilt is the real winner though with it's gradient purples and patient holder.


Kathy's quilt is even more purpley splendor for you to enjoy. Her Braided Chains will truly wrap someone up in warm goodness when it's quilted.


Fawn made the 90" square quilt, and took on the challenge of a rainbow wrapping around the quilt. She nailed it, and though she had to do some ripping in the end (we all have a love hate relationship with our seam ripper), I think she loves it.


Braided Chain Details

Sizes: 41" x 45" , 54" square, 68" x 72", 81" square, 95" x 99"

Currently available only as a PDF.

Rainbow quilt is made using batiks.

Green and black quilt is made using Moda Grunge.

Both are quilted using my Lily 555 Husqvarna and a walking foot.

Quilted with Gutermann thread.

**Coloring sheet included**

Buy it - on sale through April 28th

Etsy

Payhip


I'd love to hear your thoughts on the new pattern, tell me what you think in the comments!


Happy Stitching!
Jen


New to Patterns By Jen?

2020 Monthly Color Challenge


Find paper, digital patterns, and Studio 180 Design rulers in my Etsy shop.

Find fun PBJ merchandise at Teespring

Join the Quilt and Learn with Patterns By Jen Facebook page.


Follow me on Instagram and Facebook for daily sneak peeks and updates.


Sunday, April 19, 2020

Designers Quilt Show Day 7

It's the last day of the Designers Quilt Show. Big fat frowny face!


If you missed ANY of the designers, the pages are back up and running and you can now browse to your hearts content.


Don't miss out on registering for prizes, though. Registration closes at 11:45 PM EST *tonight*!! There's fabric, patterns and goodies all waiting to go home with a lucky quilter!


Voting for your top 3 designers is open at the Designers Quilt Show page. Did you have a favorite stop this week? Go vote! You don't even have to choose just one, you can choose three! How nice is that?!

As a HUGE, GINORMOUS thank you for joining us for the quilt along I am giving away a PDF pattern of my brand new quilt pattern, Braided Chain. It's releasing this week! All you need to do is answer the question below to be entered. Thank you so much for following along, for supporting the designers and being an awesome part of the quilting world! Giveaway ends Monday night!


a Rafflecopter giveaway


Don't forget! There's still time to join the Spinning Bow Ties Quilt Along! We've just started pulling fabrics. It's a simple quilt made with simple block.

I hope you enjoyed this week and found new designers to love and follow. Thank you for joining us on this Virtual Quilt Show!

Happy Stitching!
Jen


New to Patterns By Jen?


Find paper and digital patterns in my Etsy shop.

Find fun PBJ merchandise at Teespring


Join the Quilt and Learn with Patterns By Jen Facebook page.

Follow me on Instagram and Facebook for daily sneak peeks and updates. 

Friday, April 17, 2020

Designers Quilt Show Day 6

Day 6 of the Designers Quilt Show is about to begin!
I can't believe we're nearing the end, but it's NOT the end, so don't go anywhere yet! We've got a new day of designers, a little somethin' somethin' going on tonight (read on) and tomorrow is going to have all the awesomeness of prize giveaways, voting and a recap of the awesome week we've had together.


There are still classes to be taken! Which ones have you taken or planning to take? I don't know about you, but I'm thankful that I can go back to watch them, the work week is crazy for me right now.


Prizes! Prizes! Prizes!  Have you registered yet? Did you start, but there were a few things to do, so you thought you would finish later? Well now is the time! I want you to win, but to win you have to register!!

Anyone else in their jammies at 7 and ready for bed by 8?  Ok. Truth. I WANT to be in my jammies by 7 and in bed at 8, but that just doesn't happen right now. So instead, we're all going to pretend to be in our pj's and have a pajama party at 7 PM EST TONIGHT!  If you haven't yet like Kathryn's Facebook Page, Dragonfly's Quilting Design Studio, do so now so you can watch the live event! She's got something special to share, I will be sharing the next TWO patterns coming from Patterns By Jen and there will be others, but if I told you everything, there wouldn't be any surprises, so you will just have to come.

Our last day is tomorrow, don't miss it!


Happy Stitching!
Jen

New to Patterns By Jen?


Find paper and digital patterns in my Etsy shop.

Find fun PBJ merchandise at Teespring


Join the Quilt and Learn with Patterns By Jen Facebook page.

Follow me on Instagram and Facebook for daily sneak peeks and updates.