
The March Challenge for the Island Batik Ambassadors was "Try a new technique."

I chose to try the Quick Curve Ruler from Sew Kind of Wonderful and make the Fun Poinsettia table runner. Confession: I have had this ruler for two years. I asked my LQS to order it for me, I took it out of the plastic and then it sat. And sat. And sat. I am so sad I waited to use this ruler.

My version of Fun Poinsettia.
I used four of the fabrics given to me by Island Batik as part of their ambassador program; Eucalyptus (the fabric with a a little yellow mixed in), Ivy, Branches in Light Smore from the Mountain's Majesty line, and the flange is Bubbles in Raspberry.

I found the Quick Curve Ruler to be easy to use and very accurate. Cutting the units larger than needed and then trimming makes getting accurate units easy.. I have only made this one project, but I look forward to making something else. Truly that only happens if I enjoy the use of this ruler.
TIPS

To see a video of how to sew curved seams (and press them) see:
https://www.facebook.com/PatternsByJen/videos/911589272353776/
*I added the band-aids shown in the first picture to try and help the slipping, becasue I couldn't get to the store, but on the pieces I used for this challenge, you can see I've added clear medical tape to the backside of the ruler. This makes cutting and trimming so much easier when you don't have to worry about slippage.*

I like to mark my fabrics with Frixion pens, but I have seen batik quilts that have been marked with them, and had the color wiped out, so I did a little test.

Marked

Pressed. You can see the x's have now turned white and there was nothing I could do to get rid of them, or find my color. I haven't had this issue with other fabrics, but I also only mark cutting lines iwht my frixen pens, so I don't worry bout it too much. However, I wanted to test the batik/Frixion pen mix for you. As with all things quilty, do what works for you.

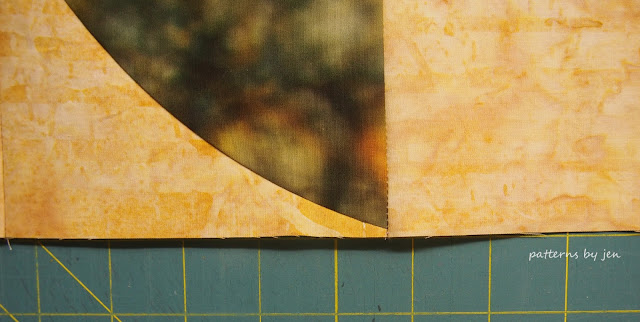
Onto cutting out the units. I find it is very helpful in keeping your accuracy, if you line up the pieces you are marking, with the straight lines on your cutting mat. When marking my cutting lines I made sure that my ruler lined up straight along the fabric line. It's easy to just start marking 1/2 inch willy nilly, but there can be a slight varience to the mark if the ruler isn't squared up, and that can make a difference in your cutting and then your sewing. (Yes, I used my frixen pen to make these marks.)

If you happen to be making the Fun Poinsettia pattern, it calls for an exact measurement, no need to mark the 6" line. I found that if I lined up the cutting curve so the fabric was at the top of the open line, my pieces lined up well when we got to the sewing part of the design.
Once you start sewing your units together you will see that there doesn't seem to be enough space for a 1/4" seam allowance. This is ok for this pattern.

Once sewn together you get this great point within the curves.

I found that my pins did not like going into the fabric once there were layers. I switched to using my Wonder Clips to hold the rows together instead of trying to force the pins in and possibly ripping fabric or breaking pins.
When I started quilting the table topper I had issues with my thread breaking. I remembered that there had been discussion about this issue with quilting batiks and switched out my needle. I usually use an 80/12, but I switched to a 100/16 for the quilting and to add the binding. I didn't have a single thread breakage the rest of the time. Way less stress that way!

I like to mark my fabrics with Frixion pens, but I have seen batik quilts that have been marked with them, and had the color wiped out, so I did a little test.


Pressed. You can see the x's have now turned white and there was nothing I could do to get rid of them, or find my color. I haven't had this issue with other fabrics, but I also only mark cutting lines iwht my frixen pens, so I don't worry bout it too much. However, I wanted to test the batik/Frixion pen mix for you. As with all things quilty, do what works for you.

Onto cutting out the units. I find it is very helpful in keeping your accuracy, if you line up the pieces you are marking, with the straight lines on your cutting mat. When marking my cutting lines I made sure that my ruler lined up straight along the fabric line. It's easy to just start marking 1/2 inch willy nilly, but there can be a slight varience to the mark if the ruler isn't squared up, and that can make a difference in your cutting and then your sewing. (Yes, I used my frixen pen to make these marks.)

If you happen to be making the Fun Poinsettia pattern, it calls for an exact measurement, no need to mark the 6" line. I found that if I lined up the cutting curve so the fabric was at the top of the open line, my pieces lined up well when we got to the sewing part of the design.

Once you start sewing your units together you will see that there doesn't seem to be enough space for a 1/4" seam allowance. This is ok for this pattern.

Once sewn together you get this great point within the curves.

I found that my pins did not like going into the fabric once there were layers. I switched to using my Wonder Clips to hold the rows together instead of trying to force the pins in and possibly ripping fabric or breaking pins.
When I started quilting the table topper I had issues with my thread breaking. I remembered that there had been discussion about this issue with quilting batiks and switched out my needle. I usually use an 80/12, but I switched to a 100/16 for the quilting and to add the binding. I didn't have a single thread breakage the rest of the time. Way less stress that way!

I used my walking foot and thread I received from Aurifil to quilt the table runner. The thread is 50 wt, number 2915, Very Light Brass. I really thought this thread was a light green, and when I looked up the number and saw brass, it turned to a very pretty brass color. It was green until then, I swear.

I also added a berry colored flange to the binding. I will have a tutorial in a couple of weeks on adding flange to your binding. Spoiler alert: the most important rule to adding flange - don't do the math on only 3 hours of sleep. You're welcome. Ha!

I truly feel that this ruler is worth a look. If you take your time and cut accurately, you will have success when using it.
Happy Stitching!
Jen
New to Patterns By Jen?
Find paper and digital patterns in my Etsy shop.


