Tuesday, February 22, 2022

Pieced Backings - Using yardage tutorial

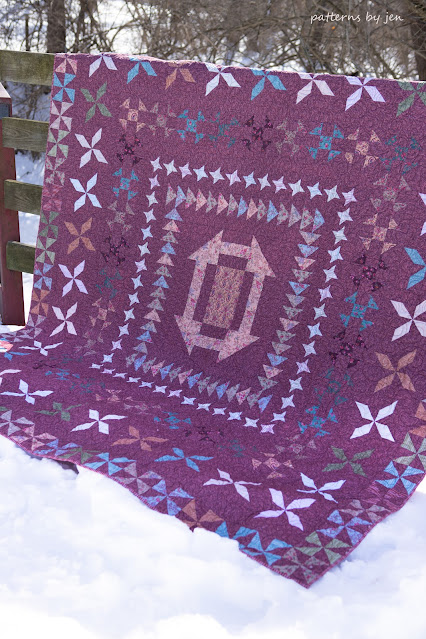
 A new pattern, The Border Quilt 4, means a new pieced backing tutorial!


I love a pieced backing. 1) It adds interest. 2) It uses up almost all of the extra fabric.


Sometimes when you have to order online to get fabric for a quilt you need to order more than you need because of the minimal requirement. You can see this The Border Quilt 4 wall hanging doesn't use a lot of fabric. Then add to it that I cut wrong and had to order more. . . my human-ness never shows up more than when I sew. . . I had more fabric left over than I liked. (I don't like to hang onto a lot of fabric.) Here is how I used it.

When it's this small I like to just lay out the top, for larger tops I measure and add the extra 4" around for quilting.


Then, I start laying out my fabrics. The size of this wall hanging means I don't have to add length to the yardage, I just kept selvages on.


I started with the dark orange on the bottom, planning to use the dark print in the middle. I also had the lighter orange at the top, but I really didn't like how that felt. The lighter orange is also the binding and I didn't want it to blend in all the way along the top. (Note! Make sure, if you are using the binding fabric, that you cut that first before adding the leftover to the backing!)


Instead, I decided to do more of a gradient type backing. This just feels good to me. When you have multiple strips, feel free to play around, step back and take a look. If you are really struggling with the layout take a picture and look at that instead. Sometimes it really helps to take a picture and turn it to black and white to see the contrast.


What my set up really looked like while I took pictures. Ha! When choosing the width of the strips I only made sure it would cover from top to bottom. I love when the strips are not the same width, but you can always trim them to the same width.  Make sure to straighten each edge you are sewing!


I press the seams all the same direction, but it really doesn't matter.


Once my backing is pieced I lay the top on it to make sure I have enough fabric all the way around. Note: Since I quilt my own I knew I didn't need to have as much extra on the top and bottom, because I have leaders and enders I can attach for my Babylock Coronet.


To make sure my strips remain straight on the back I line up the seams on the back with seams on the quilt top and make sure they are aligned the same on the other side.


A beautiful and simple back!!


Find The Border Quilt 4, the fourth installment of The Medallion Series from PBJ, HERE!

Do you love pieced backings, too?  Check out my tutorial for Pieced Backings using Strips!


Make something Extraordinary!

Jen

New to Patterns By Jen?

Don't forget to sign up for the Bites of PBJ newsletter while you are here for early releases and sales just for subscribers!


Find paper and digital patterns in my Etsy shop.

Find fun PBJ merchandise at Teespring

Join the Quilt and Learn with Patterns By Jen Facebook page.

Follow me on Instagram and Facebook for daily sneak peeks and updates. 

Friday, February 18, 2022

Introducing The Border Quilt 4

 I am so excited to introduce you to the fourth installment in The Medallion Series from PBJ!


A beautiful quilt made with traditional piecing and designed with the beginner in mind.


Each border added grows this quilt to whatever size you choose.


I went back to a scrappier version of quilt, like that of the original The Border Quilt and I truly love it.


Add that gorgeous dark background and these blocks just pop.


Speaking of popping, look at the wall hanging I made! Hello orange!!! It's love.


By changing the fabric choice this pattern now has a more modern look.


Let's see what the testers did with this pattern.


Sherry's top shows how well beautiful batiks work with The Border Quilt 4.


As a mom of a stars and space loving son, this top from Janice gives me goosebumps. Those friendship star blocks are the perfect ending for this top.


Beverly's quilt top show's how quickly you can grow your quilt by just adding one more border! Seeing it in these colors I think this might make a great Quilt of Valor pattern, too.


Melva's top show's how an experienced quilter can take a pattern and truly make it hers. Using the panel meant the measurements were off a bit, so she made her own little borders before adding the Flying Geese border. Just like that she has an original.


I love how each quilt is so unique to it's piecer.


Are you ready to get your pattern and start pulling pretty fabrics?!

Etsy: PDF The Border Quilt 4 pattern

Etsy: Printed The Border Quilt 4 pattern

(Ships March 15)

Payhip: PDF The Border Quilt 4 pattern


OR get all four patterns in The Border Quilt Bundle!

Etsy: PDF The Border Quilt Bundle

Etsy: Printed The Border Quilt Bundle

(Ships March 15)

Payhip: PDF The Border Quilt Bundle


Go Make Something Extra Ordinary!

Jen

New to Patterns By Jen?

Don't forget to sign up for the Bites of PBJ newsletter while you are here for early releases and sales just for subscribers!


Find paper and digital patterns in my Etsy shop.

Find fun PBJ merchandise at Teespring

Join the Quilt and Learn with Patterns By Jen Facebook page.


Follow me on Instagram and Facebook for daily sneak peeks and updates.

Tuesday, February 1, 2022

February 2022 Monthly Color Challenge

February is here and I am so ready to share the next block in the 2022 MOnthy Color Challenge!


This month the block is inspired by the bay leaf. I'm not much of a cook, but when I add that bay leaf into my beef stew I feel like such a chef. 😂


The bay leaf is an aromatic leaf commonly used in cooking. It can be used whole or in a dried or ground form.If eaten whole, bay leaves are pungent and have a sharp, bitter taste. As with many spices and flavourings, the fragrance of the bay leaf is more noticeable than its taste. When the leaf is dried, the aroma is herbal, slightly floral, and somewhat similar to oregano and thyme. - Wikipedia


This block is only a little bit difficult because of the measuring units, so when making it, take your time. Measure twice, cut once is definitely the goal here. Once the cuts are made strip piecing makes this block a quickie!

February Bloggers

Carolyn - Appliques, Quilts and More

Kate - Katie Mae Quilts

Frances - Frances Quilts

Andi - True Blue Quilts

Carole - From my Carolina Home

Raylee - Sunflower Stitcheries and Quilting


The bloggers this year will be sharing their quilts using the color of the month. Green is one of my favorite colors. Sigh, there are so many favorites. These are a few of the quilts I've made using green.


Ready to get the pattern? Go to Payhip and download it now! The block is free for the month February! Each set of instructions includes a "How To" video, one for each size offered!

To have the 2022 Monthly Color Challenge blocks sent directly to your email sign up HERE.

It's too late to have the January and February blocks emailed to you but you can download them from Payhip.

Make something Extraordinary!

Jen

New to Patterns By Jen?

Don't forget to sign up for the Bites of PBJ newsletter while you are here for early releases and sales just for subscribers!


Find paper and digital patterns in my Etsy shop.

Find fun PBJ merchandise at Teespring

Join the Quilt and Learn with Patterns By Jen Facebook page.

Follow me on Instagram and Facebook for daily sneak peeks and updates.