Tuesday, May 25, 2021

Where in the world is Jen?

 It has been a month of silence here on the blog and social media, other than prescheduled posts. Where is Jen?


Misty field


It has taken me a bit to decide to write this post for a few reasons. I have put this off because

1) I'm a pretty private person

2) I kept waiting to feel better

3)I was just too tired to try.


It has been a long few months for my family, nothing too scary, but a lot of "things" to keep track of, deal with, wade through, and apparently it got to the point of draining me physically and mentally. Add the need for a lot of dental work/mouth pain and I've spent almost every evening after child care sitting and watching tv and not accomplishing anything.


It's been hard to accept that I need to step away from some things and right now, that means taking a break from pattern designing. I have a couple of patterns to finish up, and the Monthly Color Challenge will remain (yay!), but the plan right now is to take a break.


Maybe that break will be a week, because I finally admitted I need a break to the big wide world, but right now I'm planning on the break going through the summer.


It's a scary thought, because when you pull back you lose the eyes that have found you, but faking it until I make it isn't working either.


Resident cardinal


If you are waiting for the last post for the Against the Grain Quilt Along I hope to finish that up and have it ready Wed Jun 2nd.

The May Monthly Color Challenge Link up opened yesterday, so don't forget to add your Challenge Block.

Make something Extraordinary!

Jen


New to Patterns By Jen?

Don't forget to sign up for the Bites of PBJ newsletter while you are here!


Find paper and digital patterns in my Etsy shop.

Find fun PBJ merchandise at Teespring

Join the Quilt and Learn with Patterns By Jen Facebook page.

Follow me on Instagram and Facebook for daily sneak peeks and updates.

May 2021 Monthly Color Challenge Link Up

 It's that time for the Monthly Color Challenge Link Up!


This block was another easy block and another block with a background that you could play with to get a totally different look. I love blocks like that.


You can follow #2021monthlycolorchallenge and #monthlycolorchallenge on Instagram to see the blocks as well.


Quarter 2 Sponsors


Bea Quilter - PDF Pattern

For the Love of Geese - PDF Pattern

True Blue Quilts - Book: Monochromatic Quilts Amazing Variety*

Make Modern Magazine - 6 month subscription

Island Batik - Fat Quarter Bundle*

Benartex - Fabric Bundle*

Quilters Dream Batting - 60 x 60 Dream Poly*

The Warm Company - 90 x 108 Warm and Plush 100% Cotton

Appliques Quilts and More - $10 gift certificate

Fat Quarter Shop - Gift Certificate

DayBrook Designs - 2 PDF Patterns

Patterns By Jen - Tucker Trimmer 1® ruler*

Those marked with * are for US residents only. Prize laws vary throughout different countries.


The Link Up is open through May 31st. If you have a problem linking up, please use the "question mark" button next to the log out button. If you are trying from your phone, try it from a laptop/tablet if you have one.


Good luck and thank you for stitching along with me!

Missed the block? Find it here!


Make something Extraordinary!

Jen


New to Patterns By Jen?

Don't forget to sign up for the Bites of PBJ newsletter while you are here!


Find paper and digital patterns in my Etsy shop.

Find fun PBJ merchandise at Teespring

Join the Quilt and Learn with Patterns By Jen Facebook page.

Follow me on Instagram and Facebook for daily sneak peeks and updates.

You are invited to the Inlinkz link party!

Click here to enter

Friday, May 14, 2021

Introducing "Fire" in Make Modern Issue 40

 I am so excited to share with you the newest PBJ design in Make Modern Magazine.


This is Make Modern's 40th issue! Congratulations Make Modern! The cover quilt is from designer Leanne Parson's of Devoted Quilter. You can find her on Instagram. Head over to give her a big congratulations on her first cover quilt!!

Affiliate Disclosure: This post contains Affiliate Links. When purchases are made through these links I receive a small commission at no extra cost to you. Your purchases help support my small business and keep my husband's head from exploding every time a new quilting notion arrives in our mailbox. Thank you for that. Find out more about Affiliate Links Here.


Meet Fire. A traditionally pieced, modern quilt designed for the new quilter and beyond.


I used Dutch Tulip from Cherrywood Hand Dyed Fabrics for this quilt. If you haven't heard of Cherrywood it is definitely a company you will want to check out. Their quilting cotton is hand dyed (of course) and looks like suede. It's gorgeous to work with and the colors are just saturated. I used yardage from each color in Dutch Tulip for Fire, though one of  them was just used for the binding.


Once the top was pieced I found the perfect Gutermann threads for quilting Fire and I began marking lines.


Lots and lots of lines.


I used my walking foot to quilt the entire quilt.


It took a long time, but it was so worth it.


I followed each section and I think it really helps bring your eye out from the center of the quilt to the edge.


Red binding to bring your eye to a stop at the edge of the quilt.


Fire finishes at 64" square. Use it to warm up under or as a statement piece in any room. Get Make Modern Issue 40 HERE.


Make something Extraordinary!

Jen

Don't forget to sign up for the Bites of PBJ newsletter while you are here for early releases and sales just for subscribers!


Find paper and digital patterns in my Etsy shop.

Find fun PBJ merchandise at Teespring

Join the Quilt and Learn with Patterns By Jen Facebook page.

Follow me on Instagram and Facebook for daily sneak peeks and updates. 

Wednesday, May 5, 2021

Against the Grain Quilt Along ~ Quilt Assembly

 For the next two weeks we are putting our quilt top together and getting it prepped for quilting.


Affiliate Disclosure: This post contains Affiliate Links. When purchases are made through these links I receive a small commission at no extra cost to you. Your purchases help support my small business and keep my husband's head from exploding every time a new quilting notion arrives in our mailbox. Thank you for that. Find out more about Affiliate Links Here.


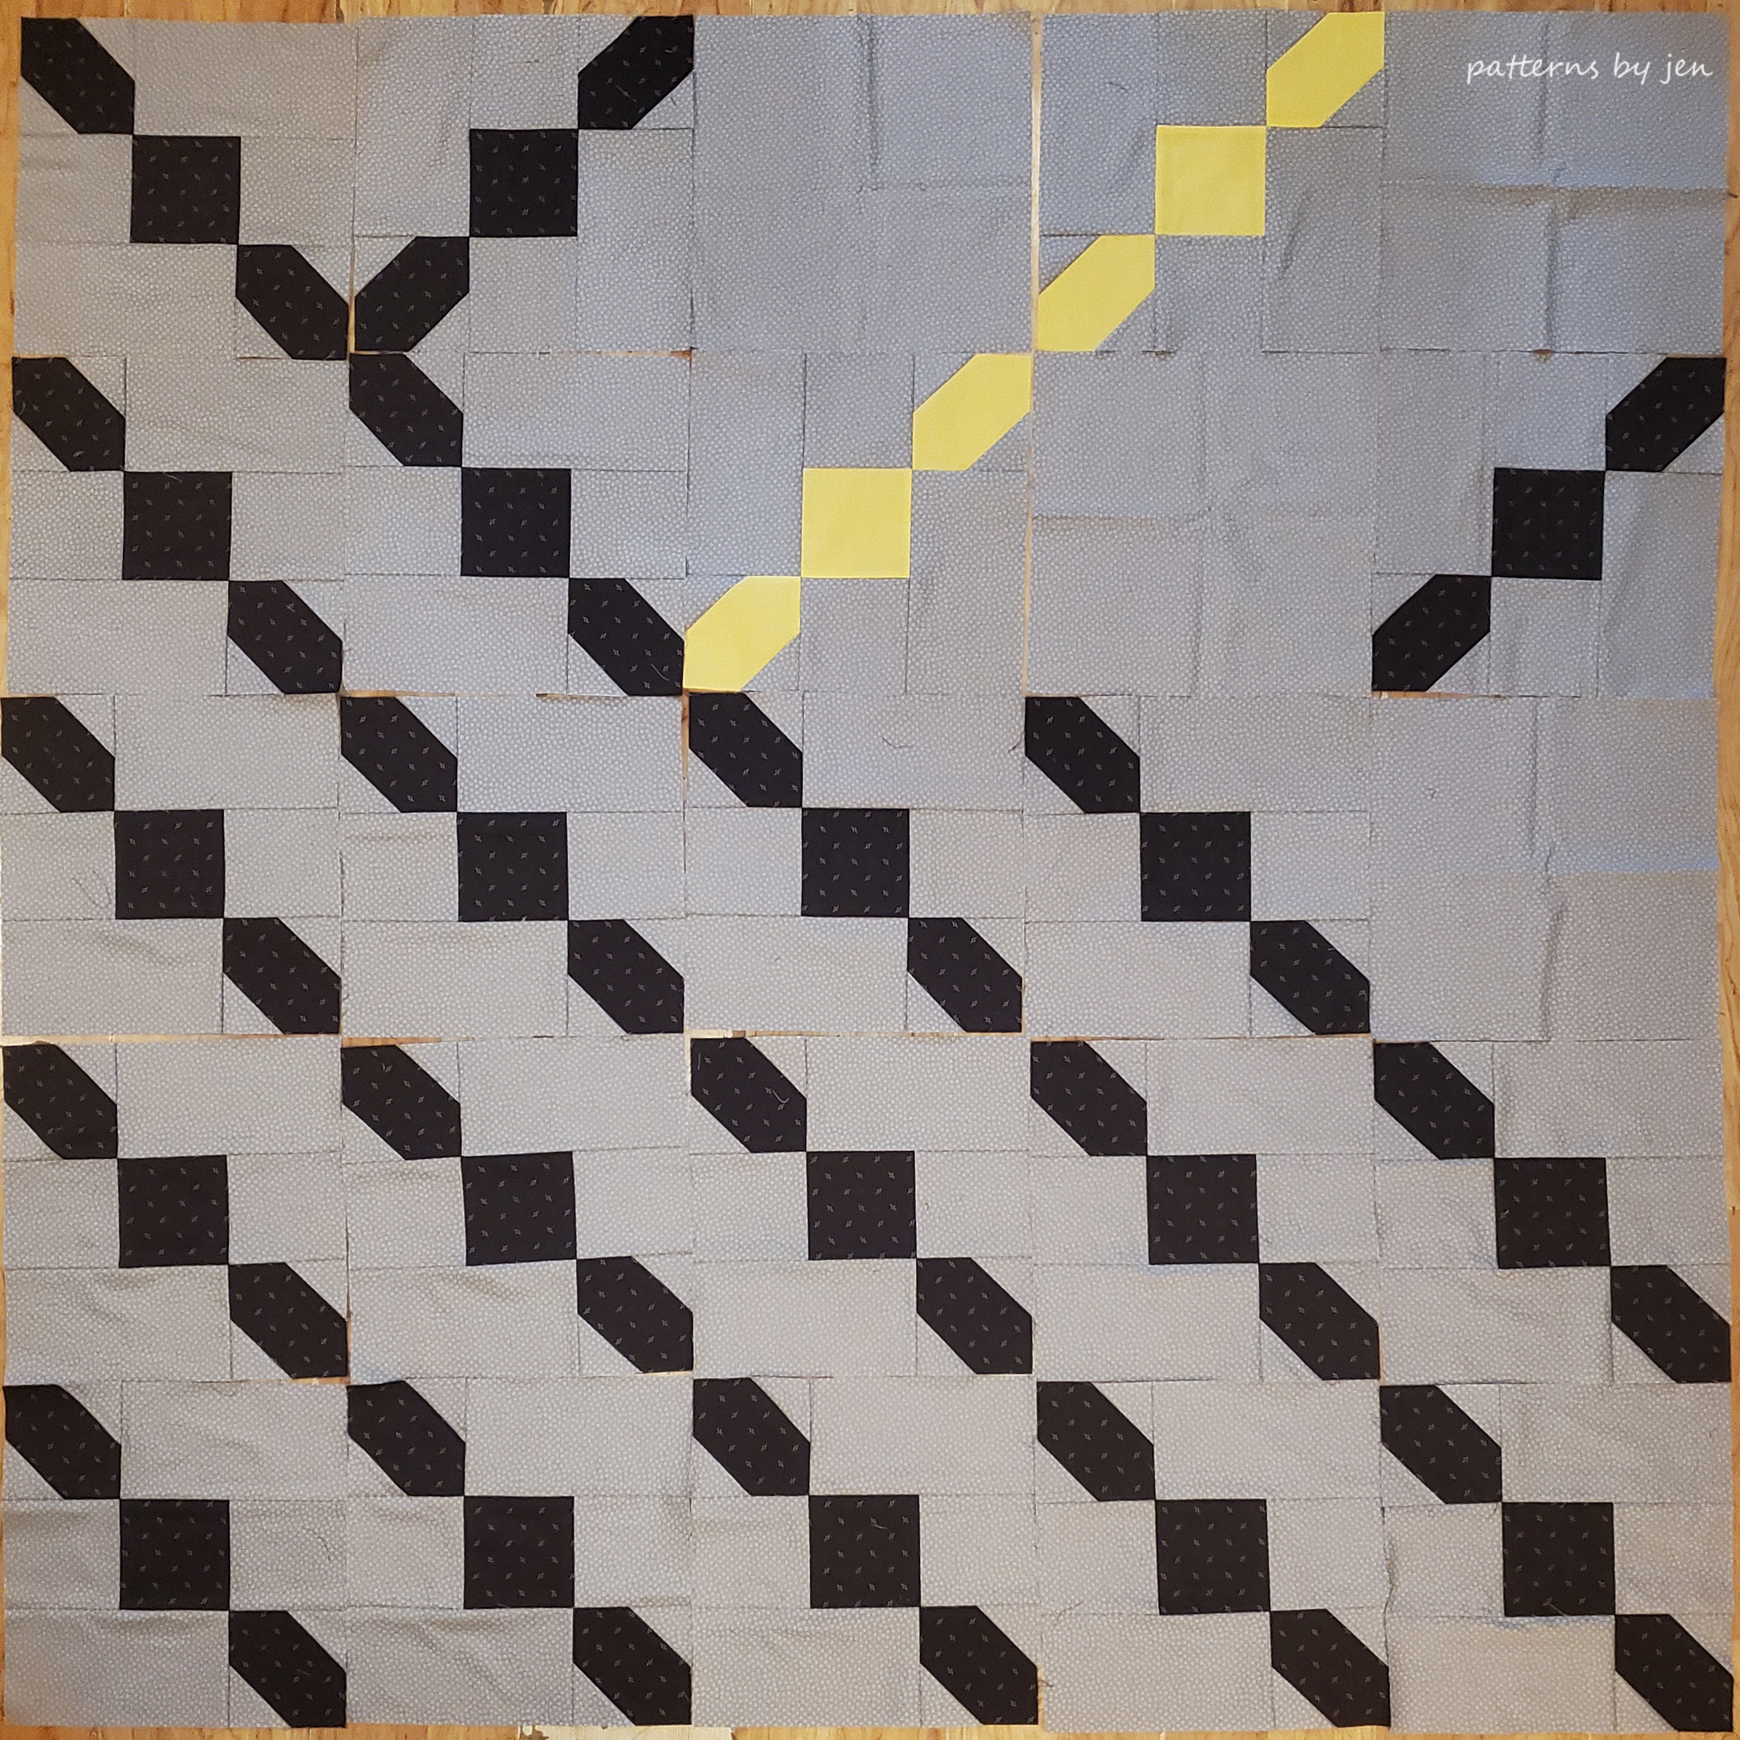
I love getting to this part in the quilting process, but I also start to get restless. I want to see the top put together, but I'm ready to get started on the next quilt project, too. Today I'm sharing my tips on putting quilt tops together efficiently.


I don't have a wall to set my blocks on, with two cats I think I would just get too frustrated trying to keep them off or fix what they knocked down, so I sweep and wash the fake hardwood floor in my child care area and lay it out there. (Do you see my mistake?)


Once I lay out the blocks I mark the rows. I found these in the Dollar Store area in Target, but you can use pieces of paper and pins or fancy Alphabitties found at the Fat Quarter Shop.


When I'm done laying out my blocks and marking my rows I can stack each row and then stack the rows and they will stay organized if I need to walk away at any point.


Take a moment when you are laying out the quilt to check which direction your seams are going. You should be able to turn a block, with it still facing the right direction, and get the seams to nest together.


Picture to show blocks 1&2 and 4&5 sewn.

For this quilt I have just five blocks per row and my process is this: 

Row 1: Sew blocks 1 and 2, leave my presser foot down, sew blocks 4 and 5 and leave the presser foot down. Then I cut the first set of blocks away and sew on block 3. This is where it can get tricky, but I will continue to chain piece the whole quilt like this.

Right now I have blocks 4 and 5 sewn together and blocks 1,2 and 3 sewn together and they are all still under the presser foot like chain pieced units. While they are still there I will start on Row 2. 

I sew Row 2 blocks 1 and 2, and then 3 and 4. Leaving blocks 3 and 4 under the presser foot I clip the threads from the other blocks. Now I will finish Row 1 sewing 1,2,3 to 4,5 to finish, and then sew Row 1&2 blocks to 3. At this point I start on Row 3 as I did above with Row 2 and continue on, pressing each row as I finish it.

Yikes, it's so much easier to do it than to explain it! This is also not the only way to do this! If you want to do one block at a time press and add the next and so on, do it. Quilting is only fun if you do it your way and enjoy the process!


I leave my markers on the blocks throughout the process. Not only does it keep my rows in order, but when I'm pressing I know this row I press towards the marker, this one is away from the marker.


I do the same thing when sewing the rows together, first the top two and the bottom two and work my way toward the middle. I find that doing it this way keeps the top from getting too "top heavy" when sewing just one strip on from top to bottom. Unfortunately, I didn't see the turned block until I had already sewn row three on.


Fortunately (???) I've done this enough times that I can fix this quickly. First, just rip the row seam just past the block that needs to be fixed.


Next, rip the seam that is connecting the offending block. Once you have that section loose rip out any other seams, in this case just the one connecting it to the solid block. Flip the block and sew in the reverse order you ripped. In this case, stitched to the solid, then I will finish the row, and then match up seams and finish that row...again.  Don't sew the whole row, just stitch a few locking stitches an inch or so from the ripped area and then finish the seam.


Annnnd done. Sigh, or not. Who was running this show??!!


So while my sewing method may up my efficiency, my layout time needs a little work. I did get it done though, and correctly.


My next step is the first step in prepping my top for quilting: use the lint roller. Hit your top with the lint roller to quickly pick up those stray threads. Doing this now means you won't have to fight with them after they have been quilted into the top. For those threads that are coming out of the seams from the back, carefully trim those, don't pull them out.

Our next step is sandwiching the top.  I share a how-to in THIS POST that includes how I piece batting. While this how-to is on a smaller scale it is exactly how I do larger pieces, I just do it on the floor.

In two weeks we start quilting!! So piece your top, sandwich it and then start pulling thread and thinking about how you want to quilt it. If machine quilting isn't something you are very confident about you can look into String and a Story Intro to Free Motion class. OR if you want an in-depth free motion course get on her WAITING LIST for a summer of learning free motion!!!

See you in two weeks!

Make something Extraordinary!

Jen

New to Patterns By Jen?

Don't forget to sign up for the Bites of PBJ newsletter while you are here for early releases and sales just for subscribers!


Find paper and digital patterns in my Etsy shop.

Find fun PBJ merchandise at Teespring

Join the Quilt and Learn with Patterns By Jen Facebook page.

Follow me on Instagram and Facebook for daily sneak peeks and updates. 


Saturday, May 1, 2021

May 2021 Monthly Color Challenge

 If  "April showers bring May flowers" what does April rain, snow, frost, heat and cold bring?!


While brown seemed like an odd choice for May in the northern hemisphere, it turns out to have been exactly right. I fully expect Mother Nature to straighten herself out by the end of the month though.


Photo credit: ©iStock from Fine Dining Lovers

I. Love. Potatoes. Russet, red, baby, sweet, mashed, fried, baked. I haven't found a potato I didn't like. We're using the russet for this month's inspiration, from the dark(ish) brown outside to the light inside.

Affiliate Disclosure: This post contains Affiliate Links. When purchases are made through these links I receive a small commission at no extra cost to you. Your purchases help support my small business and keep my husband's head from exploding every time a new quilting notion arrives in our mailbox. Thank you for that. Find out more about Affiliate Links Here.


This block is really super easy and you will have it done in no time! Which means more time for trying whatever awesome recipes the May bloggers share with us this month.

**Reminder! Each set of instructions comes with it's own How-To Video!**


May Bloggers

Bea - Bea Quilter

Sheila - So this is Kentucky

Kathy - Kathy's Kwilts N More

Raylee - Sunflower Stitcheries and Quilting

Andi - True Blue Quilts

Crystal - DayBrook Designs

Ashli - Quilt 2 End Alz

Joanne - Everyone Deserves a Quilt


This year two block sizes are offered, you can choose to make the 12" finished blocks or the 6" finished blocks, or both!


Quarter 2 Sponsors

There's a new group of sponsors! The Monthly Color Challenge has a great group of sponsors who have given generously to make this year an amazing year for you. Winners are chosen quarterly; April 1, July 1, Oct 1 and Jan 1, 2022. To enter you simply add your block to the Link Up at the end of each month. One entry per quilter and it needs to be the block from the current month. Finish each month and you will have 3 entries each quarter!


Bea Quilter - PDF Pattern

For the Love of Geese - PDF Pattern

True Blue Quilts - Book: Monochromatic Quilts Amazing Variety*

Make Modern Magazine - 6 month subscription

Island Batik - Fat Quarter Bundle*

Benartex - Fabric Bundle*

Quilters Dream Batting - 60 x 60 Dream Poly*

The Warm Company - 90 x 108 Warm and Plush 100% Cotton

Appliques Quilts and More - $10 gift certificate

Fat Quarter Shop - Gift Certificate

DayBrook Designs - 2 PDF Patterns

Patterns By Jen - Tucker Trimmer 1® ruler*

Those marked with * are for US residents only. Prize laws vary throughout different countries.


Tips


Some tips for successful piecing.


When marking your diagonals don't line up your ruler/straight edge right on the point, but just a tish over.


Now your line will be drawn exactly point to point.


Chain piece when stitching the HST units. Here I drew one line, in the How-To video I show how to use the Quilters Magic Wand™ from Deb Tucker's Studio 180 Design and found in my Etsy Shop.


When adding the third and forth triangles to the Square in a Square unit you should have 1/4 inch overhang on each end. You can see the Purple Thang in the background that I used in the How-To video.


When stitching the block together, sew with the Square in a Square unit on top so you can keep those points.


For this block we are pressing the seams open on our strip piecing. If you are concerned that this process weakens the seam you can shorten your stitch length or simply press to one side. These seams will match up with the corners of the Square in a Square unit and it can get bulky, that is why I recommend pressing open.


After you have set the seam with a hot iron as shown above, finger press your seam open before coming back with a hot iron and pressing them flat.


Trim off as little as possible from one end before rotating and sub-cutting your units to the specified size.


That's it! May is done! 

Ready to get the pattern? Go to Payhip and download it now! The block is free for the month of May!

To have the block sent directly to your email sign up HERE.

It's too late to have the January through May blocks emailed to you but you can download them from Payhip and get ready to have the rest of the year arrive in your email inbox.

Make something Extraordinary!

Jen

New to Patterns By Jen?

Don't forget to sign up for the Bites of PBJ newsletter while you are here for early releases and sales just for subscribers!


Find paper and digital patterns in my Etsy shop.

Find fun PBJ merchandise at Teespring

Join the Quilt and Learn with Patterns By Jen Facebook page.

Follow me on Instagram and Facebook for daily sneak peeks and updates.